

Head Chef 1 User Guide · Chapter 3
How Head Chef works
This chapter explains the few ideas the rest of the guide builds on. You can start making music without it, but these ideas help you predict what Head Chef does: why trimming a clip never damages your audio, why a recording stays put when you change the tempo, why a letter key sometimes does nothing, and what Edit > Undo can and cannot reverse.
Sessions, tracks, clips and channels #
A session is one song. It holds your tracks, your mix, the tempo and time signature, and one sample rate for all of its audio. You save it as a file ending in .headchef.
Inside a session, four kinds of things make sound or carry it:
| Item | What it holds | Example |
|---|---|---|
| Audio track | One audio clip, once you record or import one | A vocal take |
| Instrument track | One instrument and one MIDI clip with its notes | Mini Bar playing chords |
| Effect Return | One shared effect, and no clip | A Voltage Spaces reverb fed by several tracks |
| Main | The sum of everything else, and no clip | The MASTER strip in Mix |
A track is a lane in Arrange that can hold a clip. A channel is the part that mixes a sound: its processing, fader, pan, solo and mute. Every track has its own channel, which you see as a channel strip in Mix. An instrument track gets its sound from an instrument instead of a recording. Effect Returns and Main are channels without clips: they only receive sound from other channels. A session holds up to four Effect Returns and always has one Main.
In Head Chef 1 each audio track holds a single clip, and selecting the clip is the same as selecting its track. To keep a second take of a vocal, record it on a second audio track. Only an empty audio track can be armed for a new take.
Example: a new session that starts with Mini Bar has one instrument track holding an empty eight-bar MIDI clip. Double-click the clip to write notes; open Mix to see the track's channel strip next to MASTER.
To add and organize tracks, see Tracks. To work with channels, see Mixing.
Edits never change your audio files #
Head Chef edits are non-destructive. A clip does not contain audio; it points at an audio file and says how to play it:
- Source in and Source out: the part of the file that plays, counted in samples;
- the timeline start: where on the timeline that part begins;
- Clip gain: how loud the clip plays, from -144 dB to +36 dB;
- Fades: how the clip's start and end ramp up and down while it plays. In Head Chef 1.0 fades are shown on the clip but are not heard; see Add fades.
Moving, trimming, placing, nudging, fading and changing clip gain only change these values. The audio file itself is never rewritten.
Example: you trim the start of a take to cut off a breath. Later you want the breath back, so you drag the clip's left edge out again. The audio is still there, because the trim only moved the clip's source-in point. Open the Editor panel to see the exact Source in / samples and Source out / samples values for the selected clip.
Because a clip keeps the sample rate of its source, a session's sample rate is fixed once it holds audio. Session Settings then explains Sample rate is fixed because audio clips keep their source sample rate.
Where your audio is kept #
When you save, Head Chef writes the session file where you choose, a copy of the session's audio into a hidden .headchef-media folder next to it, and your takes into a hidden .headchef-recordings folder, which it fills while you record. The files you imported stay where they were, unchanged. Keep the session file and both folders together when you move or back up a session.
To shape clips, see Editing audio. To learn more about takes, see Recording audio.
Two kinds of time #
Head Chef keeps time in two ways at once.
- Samples are the audio's own clock. At 48 kHz there are 48,000 samples in each second. Audio clips, the playhead position and the Arrange grid and nudge steps are measured this way, which is why the grid reads in milliseconds and samples rather than in note values.
- Musical time counts bars, beats and ticks. The time signature sets how many beats make a bar, and the tempo sets how long each beat lasts. In a new session, a quarter note is 960 ticks.
The session's tempo can be a single value or a tempo map, a list of tempo changes at their own positions. Head Chef uses the tempo map to translate between the two clocks, for example to show which bar and beat a sample position falls on.
What happens when you change the tempo depends on which clock an item follows:
| Follows the tempo | Stays on its sample position |
|---|---|
| MIDI clips and notes | Audio clips |
| The metronome and count-in | The Arrange grid and nudge steps |
| The bar lines on the ruler | |
| Voltage Spaces echo with Echo Sync on |
Example: you record a vocal at 110 BPM, then raise the tempo to 120 BPM. Your MIDI drums play sooner and closer together. The vocal stays exactly where it was in time, at its original speed and pitch, and the bar lines move around it. So set the tempo before you record audio that has to line up with the bars.
Clock formats #
The clock in the toolbar can show the cursor position in three formats: BARS | BEATS | TICKS, MIN : SEC . MS and SAMPLES. Click the clock to step through them. Until you choose, Head Chef shows bars and beats when the session has instrument tracks, and minutes and seconds when it holds only audio. The status bar always shows the position in samples as well.
To change the tempo, see Tempo and session settings. For the clock and ruler, see Transport and navigation.
The signal path #
Every sound you hear travels the same route through Head Chef, and Render Mix uses the same route to write your song to a file.
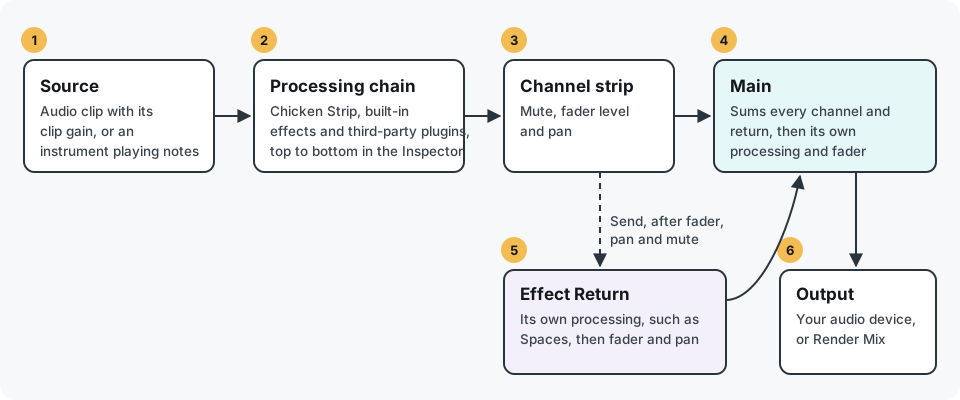
- Source. The sound starts as an audio clip, with its clip gain, or as an instrument playing the notes in its MIDI clip.
- Processing chain. The channel's processing runs from top to bottom as listed in the Inspector's Chain tab: Chicken Strip first, then any built-in effects and third-party plugins you add.
- Channel strip. Mute, the fader level and pan come next. Solo also acts here.
- Main. Main adds together every channel and Effect Return, then applies its own processing and fader.
- Effect Return. A send taps a channel after its fader, pan and mute, so turning the channel down also turns down what it sends. The Effect Return runs its own processing, such as Voltage Spaces, then its own fader and pan, and feeds Main like any other channel.
- Output. Main plays through your audio device, or into the file when you choose File > Render Mix….
Example: to put a vocal and a keys part in the same reverb, add one Effect Return with Voltage Spaces and give both channels a send to it. Pull the vocal fader down and its reverb follows, because the send comes after the fader.
To build chains and sends, see Mixing. To write the file, see Rendering.
Selection and keyboard focus #
Many controls act on what is selected. Click a track's name button or its clip to select it. The selected track then drives:
- the Inspector, which shows that channel's processing, sends and controls in Arrange and Mix;
- the Editor panel and the Region Editor Window, which show the selected clip;
- the commands that act on one track, such as ⇧S for solo, ⇧M for mute and ⇧R to arm;
- the instrument a connected MIDI keyboard plays.
Keyboard focus is a separate idea: it decides which part of the window receives your key presses. Single-letter shortcuts, such as A to trim or D to fade in, act only while the Arrange timeline has keyboard focus and letter shortcuts are on. This keeps typing safe: when you type a track name or a value in a field, the letters go into the field and never edit your song.
Example: you type a tempo in Session Settings, close the window and press A, and nothing happens. Click the timeline, or press ⌥⌘1, to give Arrange keyboard focus, then press A again. Turn letter shortcuts on or off with Options > Arrange Letter Shortcuts (A–Z).
See Editing audio and Keyboard shortcuts.
One history for the whole session #
Head Chef keeps one edit history for the whole session. Adding a track, moving or trimming a clip, a finished clip gain change, a note edit, a fader move, a new send, a track height change and applying Session Settings are each one step. Edit > Undo (⌘Z) steps back and Edit > Redo (⇧⌘Z) steps forward, whichever view or window you made the change in.
- Head Chef keeps up to 512 steps within a fixed amount of memory, so very large edits can leave room for fewer. When the history is full, the oldest steps are dropped.
- Opening or creating a session starts a new history.
- Undo and Redo wait while you drag, type in a field, adjust a control or record.
Some changes are not steps in the history, so Undo does not reverse them: fades, sync points, clip mute and clip lock; where the cursor is; zoom and the clock format; the metronome and count-in; and settings that belong to your Mac rather than the session, such as Audio Engine and Control Surface. Change these directly.
Example: you import three files at once, then add a send and move a fader. Pressing ⌘Z three times reverses the fader move, then the send, then the whole import in one step.
For the full list, see Editing audio.
Studio and Jam #
Studio and Jam use separate windows in Head Chef: Studio is for arranging and mixing a session, and Jam is for sketching ideas. Click Jam ↗ in Studio to open Jam, or Studio in Jam to bring Studio forward. A jam is not part of a session: you can play and save a jam with no session open, and closing Studio does not close Jam.
Ideas move between them as copies:
- the Studio transfer button prints a jam to new, independent Studio tracks. Backing parts become editable instrument tracks with their sounds retained. Audio already stored in a jam becomes copied audio media. You choose Keep Jam timing or Fit Studio tempo. Printing into an open session is one step in the edit history.
- Explore in Jam… opens a transfer review. In Head Chef 1.0, this review does not copy the selected Studio notes or audio into Jam. Your session does not change.
Example: you roll a groove in Jam, hold the bass line you like and click Open editable tracks →. The backing parts land in your session at the playhead, where you edit and mix them like any other track. The jam and its window stay available.
See Jam.
Many hands on one session #
Your mouse and keyboard, a control surface and an AI assistant connected through MCP all work on the same open session, not on copies.
- A change from any of them appears in Arrange and Mix straight away.
- All of them share the one edit history, so Edit > Undo reverses an assistant's edit or a fader move on your surface the same way it reverses your own.
- If you change the session after the assistant last read it, its next edit is refused rather than overwriting your work. The assistant reads the session again and retries.
- Motorized faders and lights on a surface follow the changes you make in the window.
Example: an assistant adds a send while you adjust the vocal fader on your control surface. Both changes show in Mix, and two presses of ⌘Z reverse them.
See Control surfaces and assistants.
Preparing playback #
Some instrument parts, such as those played by Octet, are rendered ahead of time so they play back smoothly. When you press Play after such a part has changed, Head Chef first prepares it. The status bar shows Preparing playback… with a percentage, the Play button reads Cancel, and playback starts when preparation finishes.
What this means for you:
- The wait happens the first time you play such a part after opening the session, and again after something it depends on changes: its notes or sound, the tempo, the time signature or the sample rate. Playing again without changes usually starts straight away.
- Click Cancel to stop waiting. Nothing in your session changes.
Example: you edit a few notes in an Octet pad and press Space. The status bar counts up to 100 percent, then the song plays. Press Space again later and it plays at once.