

Head Chef 1 User Guide · Chapter 11
Editing audio
This chapter shows you how to shape audio clips in the Arrange window. You will select a clip and place the cursor, choose an edit mode, move and trim clips, place a clip at an exact sample, nudge it, mark fades, set clip gain, lock a clip, and undo any change. None of these edits change your audio files. Head Chef only changes which part of the file plays, where it plays and how loud.
Each audio track holds one clip. Selecting a clip and selecting its track are the same thing: click the clip, or click the track's name button.
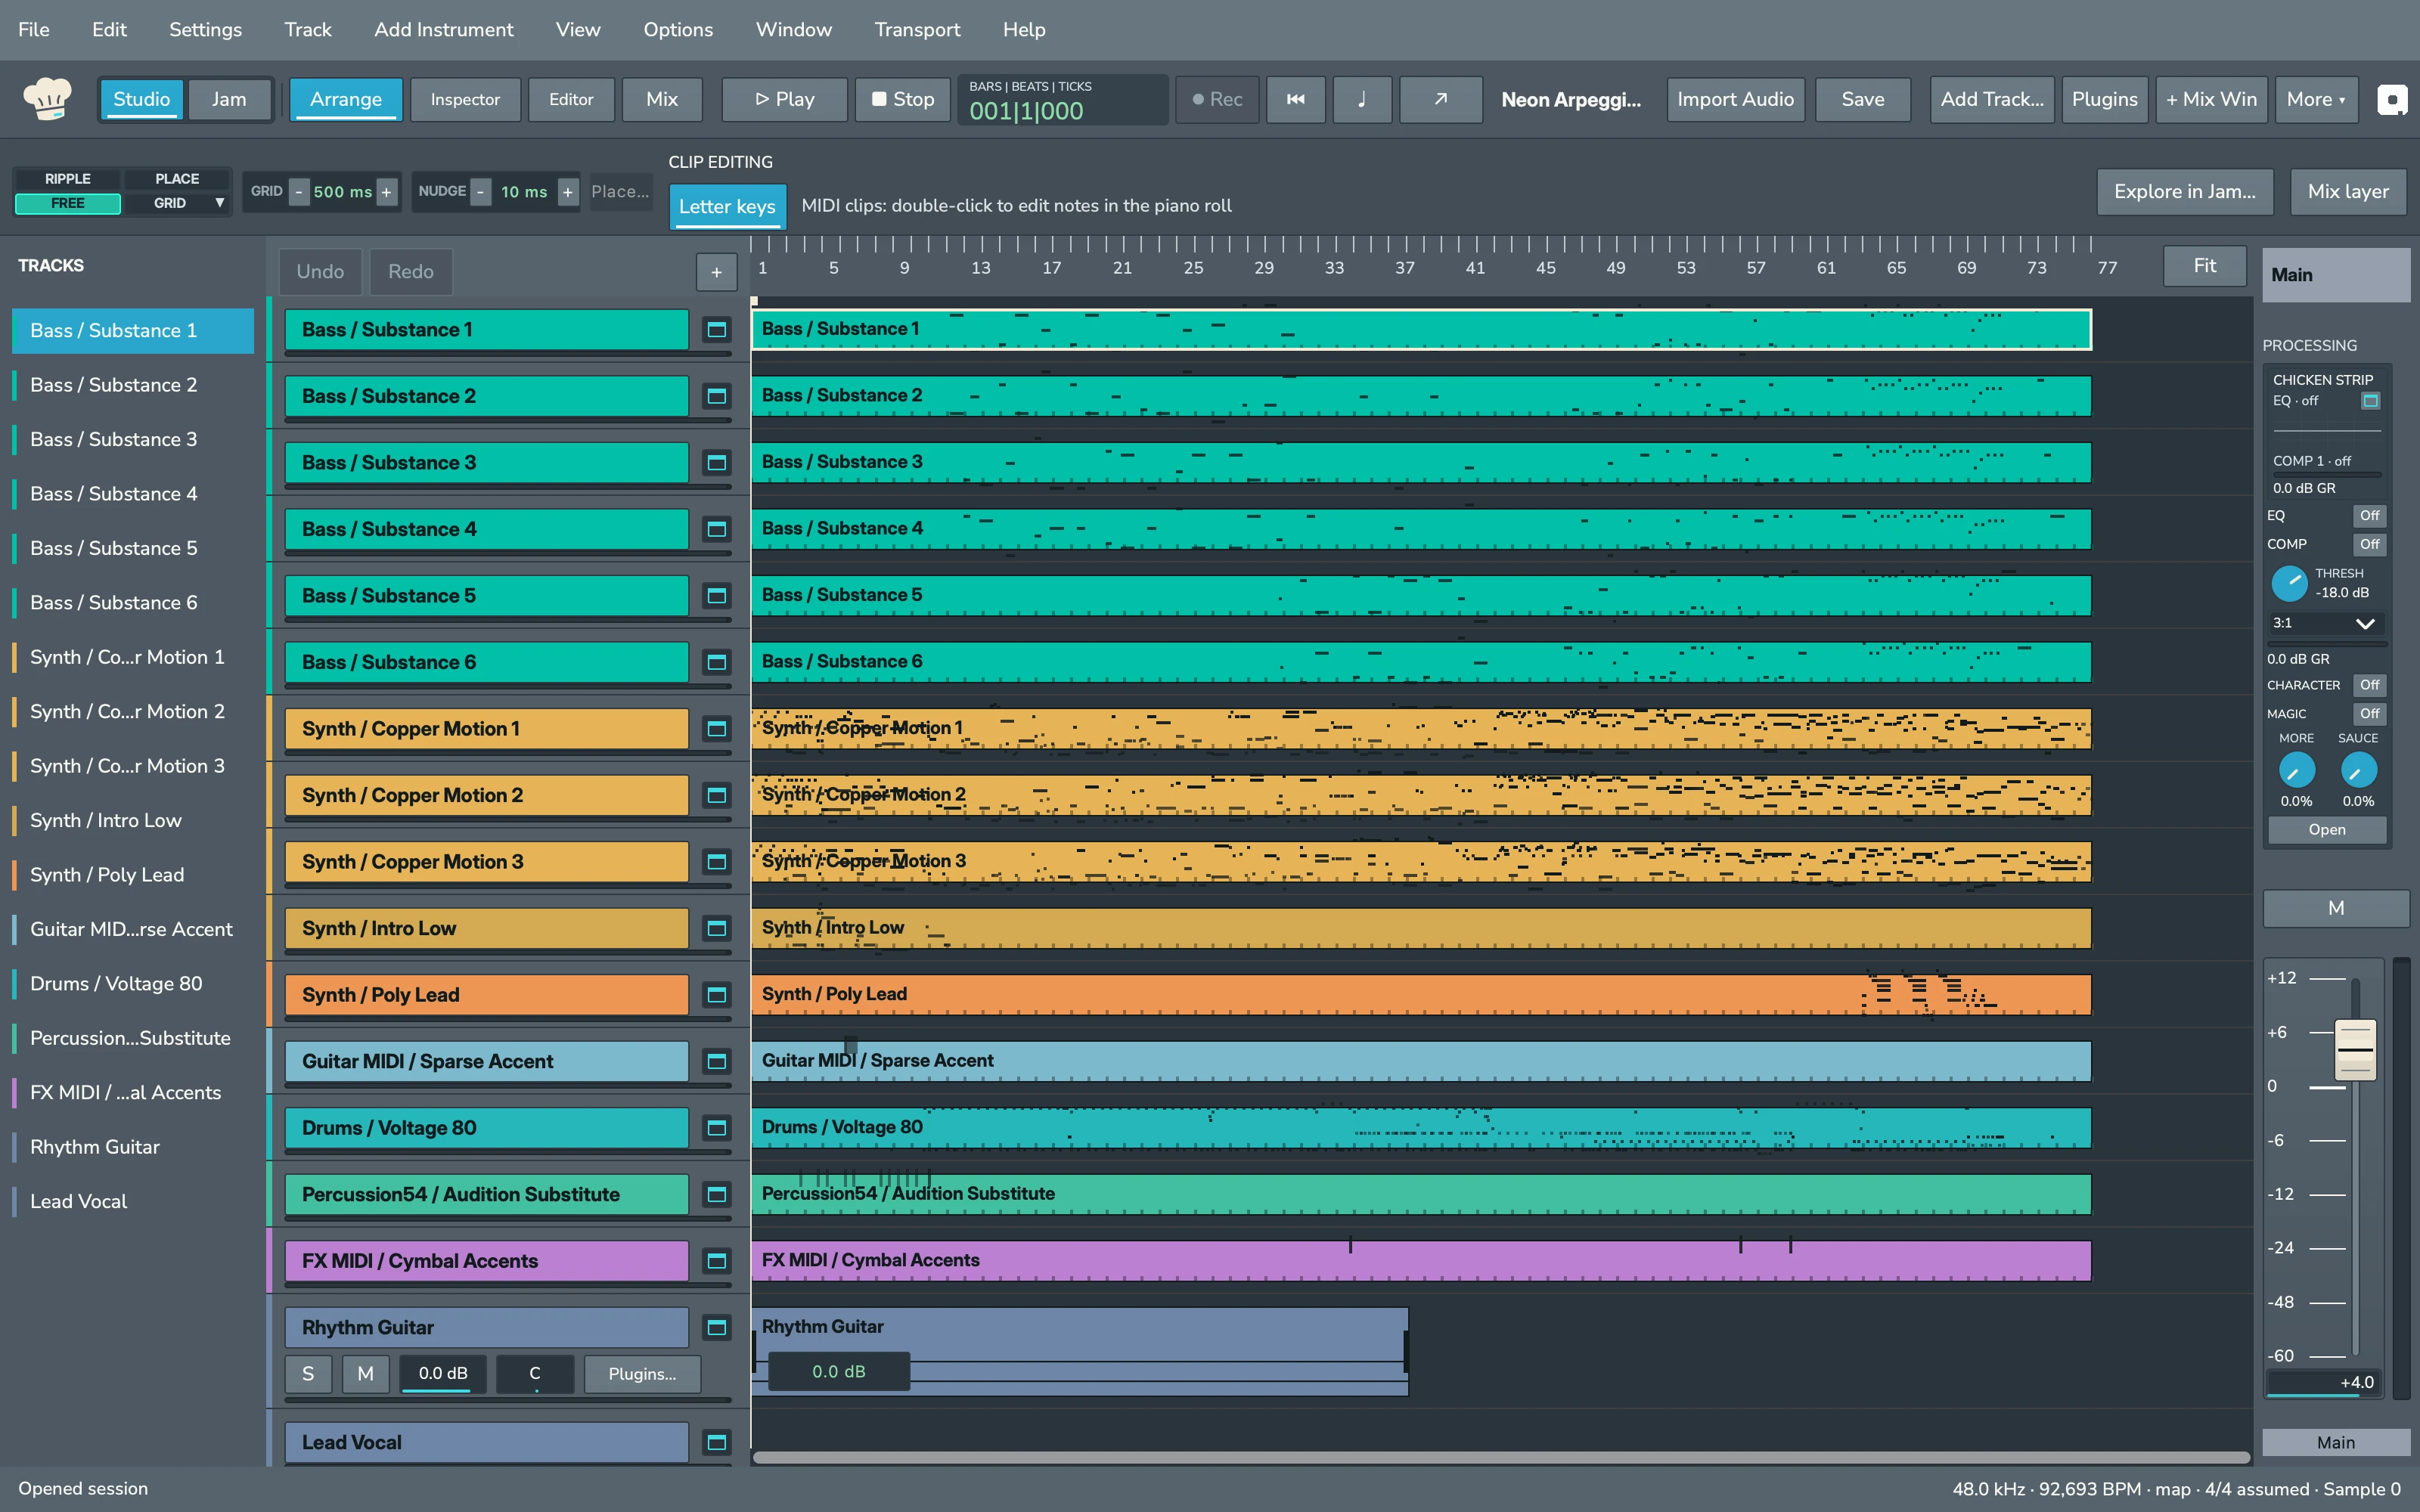
Make selections and use the cursor #
Every clip edit in Head Chef acts on two things: the selected clip and the cursor. Head Chef 1 has no time-range selection and no multiple selection, so there is nothing to drag out or ⇧-click; you choose one track, and the cursor marks the time.
Select a track and its clip #
- Click the track's name button in its header, or its name in the TRACKS list.
- Click anywhere in the track's lane in the timeline. Clicking also gives the timeline keyboard focus, which the single-letter keys need.
- With letter shortcuts on, press P for the track above and ; for the track below. The selection stops at the first and last track; it does not wrap around.
One track is selected at a time. On an audio track, selecting the track selects its clip. On an instrument track, clicking a note in the lane also selects that note, and ← and → step through the notes.
The cursor #
Head Chef has one cursor, the playhead. Playback starts from it, and the edits below that mention the cursor or the playhead use the same position. The status bar shows it in samples, for example Sample 96,000.
To move the cursor:
- Click an empty part of an audio lane, or the upper half of a clip. The pointer shows a text beam where a click moves the cursor. The lower half of a clip is for moving it.
- Press Return to stop and go to the start, or ⌥Return to go to the session end.
- Press Tab to jump to the next edge of the selected clip, and ⌥Tab to jump back to the previous edge. With letter shortcuts on, ' and L do the same.
- Click ⏪ or ⏩, or press Num 1 or Num 2, to move two seconds back or forward.
- Drag in the ruler to scrub; see Transport and navigation.
Clicking an instrument lane selects the track but leaves the cursor where it is.
With third-party plugins, pause playback, finish any plugin edit and turn off software input monitoring before choosing another playback position. Wait for Preparing cursor… to finish, then press Play. Cancel or ■ Stop withdraws a pending move. See Play from another point.
Keep the cursor in view #
With letter shortcuts on:
- Q or W centers the timeline on the cursor.
- E zooms the timeline to the selected clip. Press it again to return to the previous view.
- R and T zoom out and in around the cursor.
⌥F (View > Fit Selected Clip) fills the window with the selected clip at any time.
What each edit acts on #
| Edit | Acts on | Uses the cursor |
|---|---|---|
| Drag to move or trim | The clip you drag, which becomes selected | No |
| A and S | The selected clip | Yes, as the new start or end |
| Place… | The selected clip | Only through Use Playhead |
| Nudge and content nudge | The selected clip | No |
| H, U and K | The selected clip | Yes, as the target position |
| D, G and F | The selected clip | Yes, as the fade edge |
| Clip gain keys | The selected clip | No |
| ⌘L and ⌘M | The selected clip | No |
If no audio clip is selected, these keys do nothing.
Choose an edit mode #
The edit mode decides what happens when you drag a clip. Head Chef has four: Ripple, Free, Place and Grid. Their buttons sit at the left of the row below the toolbar.
Hover over a mode button, or reach it with Tab, to see what it does. Press Space or Return on the focused button to choose that mode; the keyboard then returns to Arrange.
| Mode | Button | Key | What dragging a clip does |
|---|---|---|---|
| Ripple | RIPPLE | F1 | Keeps the clip against the session start, so no gap opens before it. |
| Free | FREE | F2 | Moves the clip anywhere, to the sample. |
| Place | PLACE | F3 | Opens the Place dialog so you can confirm an exact position. |
| Grid | GRID | F4 | Snaps the clip start and trimmed edges to the grid. |
You can also press ⌥1 to ⌥4, or, with letter shortcuts on, press the grave accent key to cycle through the modes. Free is the default mode. The edit mode, grid and nudge values are settings of the app window; they are not saved in the session.
Ripple Lock #
To keep from switching into Ripple by accident, ⌘-click RIPPLE. The button reads RIPPLE LOCK, Ripple can no longer be chosen, and the grave accent key skips it when cycling. If you try to choose it, Head Chef shows Ripple mode is locked. Command-click Ripple to unlock. ⌘-click it again to unlock.
Grid options #
Click the small arrow on the GRID button to choose:
- Absolute Grid: clip starts snap to grid lines counted from the session start.
- Relative Grid: the clip moves in whole grid steps from where it started, keeping its offset from the grid lines. The button reads REL GRID.
- Snap to Grid: On or Snap to Grid: Off: with snap on, moves and trims also snap to the grid in Free and Place mode, always in the absolute way. You can also ⇧-click GRID or press ⇧F4.
Pressing F4 while already in Grid mode switches between Absolute and Relative Grid.
Set the grid and nudge values #
The GRID and NUDGE readouts next to the mode buttons show the current grid step and nudge step. Click - or + to step through the available sizes; the steps stop at the smallest and largest value.
Both steps are fixed numbers of samples. At a 48 kHz session rate they read:
| Readout | Steps at 48 kHz | Default |
|---|---|---|
| GRID | 1 ms, 5 ms, 10 ms, 25 ms, 50 ms, 100 ms, 250 ms, 500 ms, 1 s, 2 s | 500 ms |
| NUDGE | 1 sample, 1 ms, 5 ms, 10 ms, 25 ms, 50 ms, 100 ms, 250 ms, 500 ms, 1 s | 10 ms |
At other sample rates the same sample counts last a different time. At 96 kHz the default grid step lasts 250 ms, and at 44.1 kHz most steps show as a number of samples (smp). The grid is not measured in bars and beats.
Move a clip #
- Point at the lower half of the clip. The pointer becomes an open hand.
- Drag left or right and release. The drag starts after the pointer has moved a few pixels, so a click alone does not move the clip.
While you drag, hold ⌘ or ⌃ to ignore the grid for that drag. Press Esc before you release to cancel.
- Free: the clip lands at the exact sample you release it on.
- Grid: the start snaps to the nearest grid line, or moves in whole grid steps in Relative Grid.
- Ripple: the clip returns to the session start whatever you drag.
- Place: releasing the clip opens the Place dialog with the drop position filled in; the clip moves only when you click OK.
A clip cannot start before the session start. If you drag past it, the clip stops at sample 0. The clip's fades, sync point and clip gain line move with it.
Trim a clip #
Trimming changes which part of the audio file the clip plays. You can shorten a clip, or lengthen it again as far as the audio file reaches.
Drag an edge #
- Point at the clip's left or right edge. The pointer becomes a resize arrow.
- Drag the edge and release.
In Free, Place and Grid mode the rest of the audio stays where it is in time; only the edge moves. In Ripple mode the clip keeps starting at the session start, so trimming the start pulls the remaining audio earlier.
The edge stops at the first and last sample of the audio file, and a clip is always at least one sample long. In Free and Place mode, if lengthening the start would place audio before the session start, Head Chef refuses the trim with Cannot trim before the timeline begins. and the clip returns to its previous length.
In Grid mode, or with Snap to Grid on, a trimmed edge snaps in whole grid steps counted from the first sample of the audio file. The edge lands on a timeline grid line when the file's first sample sits on one, as it does for a clip recorded or imported at the session start.
Trim to the cursor #
- Click the timeline where you want the edge, or move the cursor there.
- With the clip selected, press A to trim the start to the cursor or S to trim the end.
The cursor can also sit outside the clip. With the cursor before the clip, A lengthens the start back to the cursor; with the cursor after it, S lengthens the end. The cursor must be over the clip's audio file: if the file has no audio at the cursor's position, the key does nothing. If the new start would come at or after the clip end, or the new end at or before the clip start, Head Chef shows Choose a non-empty clip range inside the source audio.
These keys do not snap to the grid.
Type the source range #
Click Editor in the toolbar (▤ in a narrower window) to open the panel below the timeline. Type a sample number in Source in / samples or Source out / samples and press Return. The numbers count samples from the start of the audio file. A range outside the file, or a start at or after the end, is refused with Choose a non-empty clip range inside the source audio.
Place a clip at an exact time #
- Select the clip and click Place…, or drag the clip in Place mode.
- In the Place Audio Clip dialog, choose an Anchor: Start, Sync Point or End. The number in the field changes to show where that anchor is now.
- Type the sample position in Target Sample:, or click Use Playhead to fill in the cursor position. The dialog also shows the matching bar and beat position.
- Click OK or press Return.
With Sync Point or End, Head Chef moves the clip so that point lands on the target. If that would put the clip start before the session start, the clip starts at sample 0 instead. Place does not snap to the grid.
Original Time Stamp (0) places the clip start at sample 0 straight away, whatever the anchor. Cancel or Esc closes the dialog without moving the clip.
In Ripple mode, Place accepts only positions that leave the clip at the session start; other positions show Ripple mode keeps single-clip tracks anchored at the session start.
Nudge a clip #
With the clip selected and letter shortcuts on, press ⌥. to move it later or ⌥, to move it earlier by the nudge value. Num + and Num - on the numeric keypad do the same. Nudging does not snap to the grid. A nudge that would pass the session start stops at sample 0.
Nudging a clip is not available in Ripple mode; Head Chef shows Clips cannot be nudged while Ripple mode is on.
Nudge the audio inside the clip #
To move the audio inside the clip without moving the clip's edges, press ⌘ Num + or ⌘ Num -. The clip keeps its position and length, and a different part of the file plays through it. This also moves by the nudge value and works in every edit mode, including Ripple.
At the first or last sample of the audio file the content stops moving, and the key does nothing more. The clip gain line moves with the audio. Fades and the sync point stay where they are on the clip.
Snap a clip to the playhead #
With letter shortcuts on, move the playhead where you want the clip, then press:
- H to put the clip start at the playhead,
- U to put the clip's sync point at the playhead,
- K to put the clip end at the playhead.
In Grid mode, or with Snap to Grid on, the result also snaps to the grid, so the clip may land on the nearest grid line rather than exactly on the playhead. If the clip start would come before the session start, it starts at sample 0. Use these keys in Free, Place or Grid mode.
Add fades #
- Put the playhead inside the clip, where the fade should end or begin.
- Press D to fade in from the clip start to the cursor, or G to fade out from the cursor to the clip end.
- Press F to do both at once. Each fade stops at the middle of the clip at most.
Fades appear as shaded areas over the clip. To change a fade, move the playhead and press the key again. If the playhead is outside the clip, or exactly on its edge, Head Chef shows Place the playhead inside the clip bounds to fade to cursor.
Fades are measured from the clip's edges. They move with the clip, and when you trim a clip shorter than its fades, the fades shorten to fit. A fade-in always keeps its length first; a fade-out shortens to make room for it.
Fades are linear and change the sound in playback and Render Mix before the track's plugins and fader. Each fade change is one Undo step and is saved with the session. Bypass Clip Gain leaves fades active.
Because each track holds one clip, clips never overlap and there is nothing to crossfade between them. The keyboard reference lists F as Fade In / Fade Out / Crossfade Clip because it shapes both ends of the one clip together.
Set clip gain #
Clip gain changes the level of one clip before the track's plugins and fader. It ranges from -144 dB to +36 dB in 0.1 dB steps, and the audio file stays unchanged.
Use the badge #
- Each audio clip shows a clip gain badge. If the badges are hidden, turn on View > Clip Gain Badges (⌃⇧=).
- Drag the badge up or down. Hold ⌘ for fine steps, or ⌥-click to reset to 0 dB. With the badge focused, ↑ and ↓ change the gain by 0.5 dB, or by 0.1 dB with ⌘.
- Click the badge without dragging, or right-click it, to open the Clip Gain panel. There you can drag the slider, type a value in Gain / dB, or click Bypass Clip Gain, Reset Clip Gain to 0 dB or Show Clip Gain Line.
The badge shows Byp when clip gain is bypassed, and a dot when the clip has gain line points. The Clip Gain control in the Editor panel works the same way.
Use the keyboard #
- ⌃⇧↑ and ⌃⇧↓ raise and lower the selected clip by 0.5 dB.
- ⌃⇧B restores 0 dB, turns bypass off and removes all of the clip's gain line points.
- Hold ⌃⇧ and scroll over a clip to adjust its gain.
Draw a gain line #
- Choose View > Clip Gain Line (⌃⇧-) to show the selected clip's gain line.
- Click the line to add a point, and drag points to change their level or time. Hold ⌘ for fine steps.
- Select a point and press Delete to remove it, ↑ and ↓ to change its level by 0.5 dB (0.1 dB with ⌘), or ← and → to move it by one sample. Press Esc to cancel a drag.
A clip holds up to 1024 points. The badge's overall gain and each point add together, and the result must stay between -144 dB and +36 dB, so the badge's range narrows when points are already high or low.
Gain line points belong to the audio, not to the clip's edges. When you move the clip, or nudge the audio inside it, the points move with the audio. When you trim a clip, points in the trimmed-away part stay hidden and come back if you lengthen the clip again. Before the first point and after the last, the gain holds that point's level, so a hidden point still sets the level at the clip edge next to it.
Each finished clip gain change is one step in the edit history, and clip gain is saved with the session.
What happens at the clip boundaries #
| Edit | At the session start | At the ends of the audio file | Length |
|---|---|---|---|
| Drag to move | Stops at sample 0 | Not affected | Unchanged |
| Drag an edge | Refused in Free, Place and Grid if audio would start before sample 0 | Stops at the first and last sample | At least one sample |
| A and S | Not affected | Nothing happens if the cursor is beyond the file | Refused if the clip would have no length |
| Typed source range | Refused if audio would start before sample 0 | Refused outside the file | Refused if the clip would have no length |
| Place…, H, U, K | Clip starts at sample 0 instead | Not affected | Unchanged |
| Nudge | Stops at sample 0 | Not affected | Unchanged |
| Nudge the audio inside | Not affected | Stops at the first and last sample | Unchanged |
| Fades | Not affected | Not affected | A fade never exceeds the clip |
There is no fixed session end: the session ends where its last clip ends.
Sync points #
A sync point is a marked position inside a clip, such as a downbeat or a hit, shown as an orange line. When a clip has no sync point of its own, it is the clip start, and U then works like H. Use it with the Sync Point anchor in the Place dialog and with U.
The sync point is measured from the clip start, so trimming the start moves it to a different part of the audio. Head Chef 1 sets a clip's sync point through the assistant connection; see Control and automation.
Lock or mute a clip #
- Press ⌘L to lock the selected clip. A locked clip refuses moves, trims, placement, nudges, content nudges, snapping to the playhead, fades, gain changes and mute changes, and Head Chef shows Clip is locked. Unlock the clip first. Press ⌘L again to unlock it. You can still drag a locked clip on screen, but it returns to its place when you release. Edit > Undo can still change a locked clip.
- Press ⌘M to mute the selected clip. A muted clip appears darker and plays silence while you play the session. Press ⌘M again to hear it.
Clip mute, clip lock and sync points are saved with the session and restored by Undo and Redo. A muted clip is silent in playback and Render Mix. Muting a clip leaves its audio file unchanged.
Letter shortcuts #
Single-letter keys work when the Arrange timeline has keyboard focus and letter shortcuts are on. Turn them on or off with the Letter keys button under CLIP EDITING, or with Options > Arrange Letter Shortcuts (A–Z). They are on when Head Chef starts. Click the timeline, or press ⌥⌘1, to give it focus.
| Key | Action |
|---|---|
| A / S | Trim the clip start or end to the cursor |
| D / G / F | Fade in, fade out, or both |
| H / U / K | Snap the clip start, sync point or end to the playhead |
| P / ; | Select the previous or next track |
| L / ' | Move the cursor to the previous or next clip edge |
| Q / W | Center the timeline on the cursor |
| E | Zoom to the selected clip, and back |
| R / T | Zoom out or in |
| Grave accent | Cycle edit modes |
| Z / ⇧Z | Undo and Redo |
For the full list, see Keyboard shortcuts.
Undo, redo and the edit history #
Every change to the song is one step in the edit history: adding a track, moving, trimming, placing or nudging a clip, a finished clip gain change, a track height change, Session Settings, and more.
- Choose Edit > Undo (⌘Z) or Edit > Redo (⇧⌘Z), or click Undo and Redo above the track headers.
- Point at either button, or reach it with Tab, to read which edit comes next. The description follows the edit history through Undo and Redo. Saving or selecting a track leaves the next undoable edit unchanged.
- Head Chef keeps up to 512 steps, within a memory budget of 64 MiB. When the history is full, the oldest steps are dropped.
- Opening or creating a session starts a new history.
- Undo and Redo wait while you are dragging, typing in a field, adjusting a control or recording.
Fades, sync points, clip mute and clip lock use the same edit history. A combined change to clip gain and these properties is one Undo step. When clips are linked for editing, one Undo restores every affected clip.