

Head Chef 1 User Guide · Chapter 16
Plugins
This chapter helps you use plugins in Head Chef: your own effects, Head Chef's built-in bitsnacks products and audio editors that work on your recordings. You find plugins in the Plugin Browser, add them to channels, keep your plugin folders up to date and recover if a plugin stops.
Plugin formats Head Chef uses #
Head Chef works with these plugin formats:
| Format | File extension | What Head Chef uses it for |
|---|---|---|
| CLAP | .clap | Effects on a channel. |
| VST3 | .vst3 | Effects on a channel, and ARA 2 editors for audio. |
Third-party effects go in a channel's processing chain on audio tracks, instrument tracks, Effect Returns and Main. Head Chef's own instruments and effects are built in, so they need no installation.
Open the Plugin Browser #
Click Plugins in the toolbar, or choose View > Plugin Browser. The PLUGIN BROWSER panel opens on the right and shows the channel it works on, for example Selected channel · Lead Vocal.
- Type in the search field to find a plugin by name.
- Narrow the list with All, Synths, Inserts, FX, Strip or Tracks.
Each card shows a badge: INST for a built-in instrument, FX BUS for a built-in effect that runs on an Effect Return, CLAP or VST3 for your plugins, STRIP for Chicken Strip and AUDIO for a new audio track. The buttons on a card act on the selected channel:
| Button | What it does |
|---|---|
| Load | Loads a built-in instrument onto the selected instrument track. |
| Insert | Adds an effect plugin to the selected channel. |
| Send | Adds a send from the selected channel to an existing Effect Return. |
| Open | Opens the plugin's window. |
| + Track | Creates a new track with this instrument or effect. |
| + Return | Creates a new Effect Return with this effect. |
Double-click a card to open its window.
Drag plugins onto tracks #
You can also drag a card where you want it:
- Onto a track in Arrange, or a strip in Mix, to add it to that channel.
- Onto the Inspector, to add it to the channel the Inspector shows.
- Onto an empty area below the tracks or strips, onto the drop zone at the top of the browser, or onto Add Track… in the toolbar, to create a new track or Effect Return.
The CHANNEL INSERTS area at the bottom of the browser lists the plugins on the selected channel. Click Open to show one, or × to remove it.
Add a plugin from a channel #
- Select the channel and open the Inspector's Chain tab.
- Click + Third-party Plugin. On a Mix strip, click + Plugin.
- In the dialog, filter the list with Filter discovered plugins….
- Click a plugin's row to insert it, or select it and click Add Plugin.
The dialog also lists the channel's current plugins under Active channel insert slots, with Open and Remove for each. To reorder or bypass a plugin, use the Chain tab. See Mixing.
Plugin folders and rescanning #
Head Chef searches the standard plugin folders on your Mac automatically:
~/Library/Audio/Plug-Ins/CLAPand/Library/Audio/Plug-Ins/CLAP~/Library/Audio/Plug-Ins/VST3and/Library/Audio/Plug-Ins/VST3/Network/Library/Audio/Plug-Ins/VST3
To add a folder for plugins installed somewhere else:
- Click + Third-party Plugin in the Inspector's Chain tab, or Folders… in the Plugin Browser.
- Click Edit Folders….
- Type the folder's path in Additional plugin folder, or click Browse… to choose it.
- Click Add Folder.
Head Chef also searches folders inside the ones you add. Click Remove next to a folder to stop searching it. Clear Search standard folders to use only your own folders. Click Rescan after you install or remove plugins. While it works, the dialog shows Checking plugins with a count.
If a plugin fails to load during a scan, the dialog shows how many could not load. Click Details to see which ones and why. After you update a plugin, click Retry blocked plugins to try it again. Your folder list is a setting on your Mac, and scanning never changes your session.
Open plugin windows #
Click Open next to a plugin in the Chain tab. Head Chef shows a window with the plugin's Sound controls, 32 at a time, with Previous and Next to page through them. For a CLAP plugin, click Open Plugin Window to show the plugin's own interface. Changes you make in either place go into Edit > Undo like any other edit.
bitsnacks product panels #
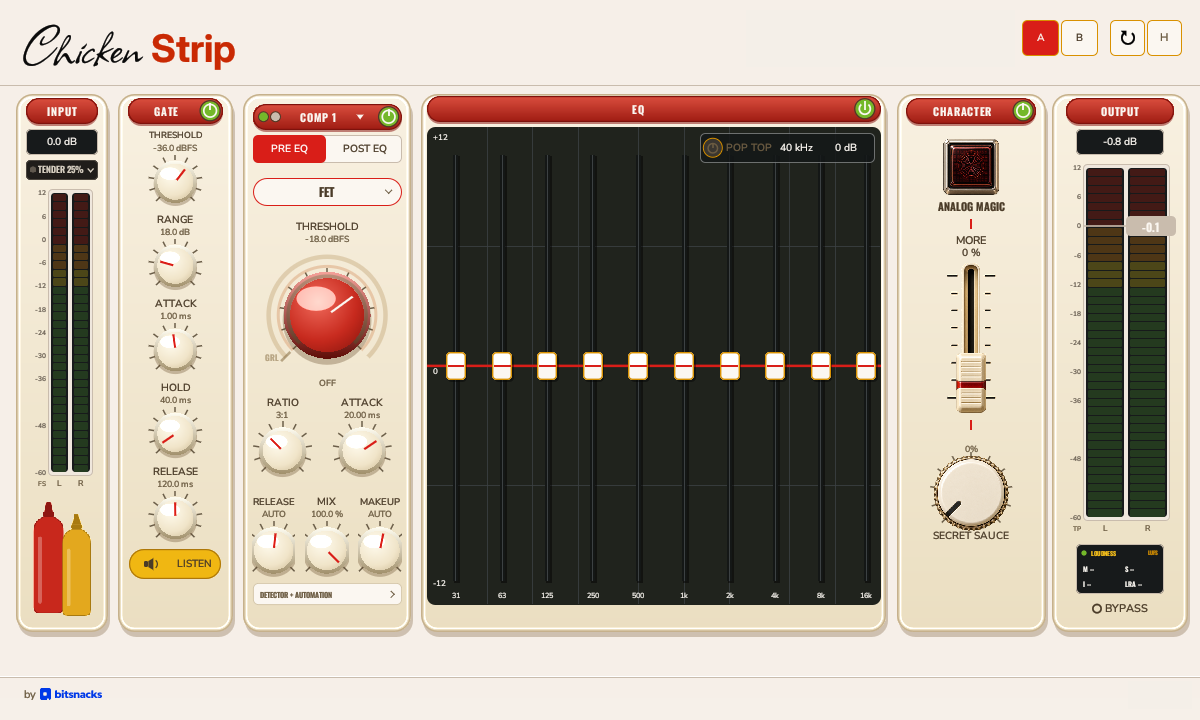
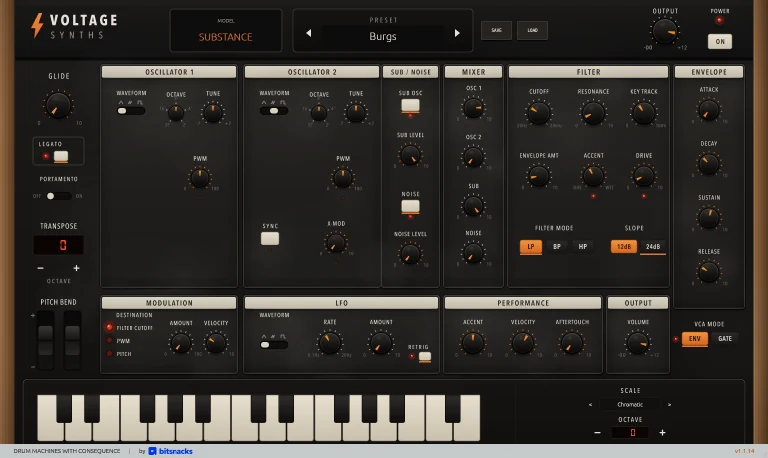
Chicken Strip, Voltage Spaces, Voltage 80, Substance and Octet open in their original bitsnacks panels, the same artwork and controls as the standalone products. They run inside Head Chef, so there is only one copy of the sound and edits from the panel are part of your session.
- Chicken Strip: click Open in the Inspector's Strip tab or next to Chicken Strip in the Chain tab, or double-click the Chicken Strip summary on a Mix strip.
- Voltage Spaces: click Open next to it in the Chain tab, or click the small window icon next to the effect name on its return strip.
- Voltage 80, Substance and Octet: click the instrument's name under INSTRUMENT in the Inspector.
Mini Bar has its own panel inside Head Chef. See MIDI and instruments.
Play and record with Amp and Tuner #
Amp and Tuner is a built-in insert for guitar and bass. Adding it loads Clean, one of the supplied original sounds. You can also load unchanged .nam captures and mono or stereo WAV cabinet impulses.
- Select a track and open the Inspector's Chain tab.
- Add Amp and Tuner from the built-in effects list, then click Open beside it.
- Open Library to choose Clean, Edge of Breakup, Crunch, High Gain or Bass. Search by name or available capture details, mark favorites, and read the selected sound's source and license. Browse in the model row imports your own
.namfile. - Adjust Input Drive to change the level entering the capture, and Output to set the resulting level. Set the interface's physical input gain separately; Input Drive cannot repair an overloaded interface input.
- Choose a supplied cabinet in Library, or click Browse in the cabinet row to import a WAV impulse. More opens Tone EQ, gate timing and channel settings.
The insert starts before Chicken Strip. Its channel setting chooses the left input, right input or independent processing of both channels. A capture that already contains a cabinet usually needs no additional cabinet impulse. If its scope is unknown, Cabinet Auto keeps the separate cabinet off until you choose.
Model, cabinet and quality selections prepare while the previous sound continues, then fade into the selected sound. A failed selection keeps the previous tone. Undo and Redo restore the sound through the same transition. Your original recording stays unchanged.
Hear an input and record a dry take #
Choose an empty mono audio track, select its interface input, and arm it. In the amp's monitor control, Input hears that input; Auto hears the armed input at Stop and Record and plays the recorded clip during ordinary playback. Off disables Head Chef's input monitoring. Set the monitor level or independent monitor mute in More.
Record captures the unprocessed input while you hear it through the amp. The monitoring input remains open between takes. Backing tracks and the click use the normal mix, and the count-in precedes the dry take. Changing the amp's drive or output during a take changes what you hear while preserving the dry recording.
If your interface supplies direct monitoring, control that at the interface. Selecting hardware direct monitoring in Head Chef turns off its software monitoring; it cannot process or mute the interface's direct path.
Tune, compare and save sounds #
Open Tuner and choose Live Input to analyze the selected physical input, or Device Input to analyze the signal entering this insert. Choose L or R, a guitar or bass tuning, and your A4 reference. Click a target string to compare against it; click it again to return to automatic nearest-note tuning. The detected octave remains visible when a target is locked.
Silent Tune fades out the monitored guitar contribution while backing tracks and dry recording continue. Its indicator confirms when monitoring is actually muted. Hardware direct monitoring must be muted at the interface. Pin keeps the visible tuner focused when you use another control; hiding or closing its editor releases capture and its owned mute.
Library's A and B choices retain two complete amp configurations, including model, cabinet, quality and controls. Preset save and load keep those configurations together. Saving the song or a complete channel preset copies the referenced amp assets too. A missing or changed required imported asset leaves the amp silent; import the original asset again, or deliberately bypass the insert. Mix rendering refuses unresolved amp assets.
Open Automation to select a control and add musical tick positions, values in the displayed units, and Hold or Linear transitions. You can update or remove a point, clear a lane, and Undo or Redo an edit. Automation follows the song's tempo map during playback and rendering. Finish a recording before editing its automation.
If a plugin stops #
Third-party plugins run outside the main Head Chef program. If one crashes or stops responding, Head Chef keeps running, your session and your edit history stay intact, and the plugin goes silent. Head Chef shows a message such as A plugin stopped responding. Save your session, then press Play to restore its saved sound, or remove it.
- Save your session.
- Press Play. Head Chef restarts the plugin with its saved sound.
- If the plugin keeps stopping, remove it from the channel's Chain tab.
Edit audio with an ARA 2 editor #
An ARA 2 editor works directly on the audio of a clip, for example to correct pitch or timing. Your original audio always stays available.
- Select an audio track with a clip and open the Inspector.
- Click Edit with ARA….
- Choose your editor under Select ARA 2 editor and click Open Editor. Head Chef shows Analysing audio… and then opens the editor's window.
- Make your changes in the editor. Click Editor to bring its window back.
- Click Apply to render your changes into the clip, or Cancel to discard them.
After you apply, the button reads Edit with followed by the editor's name, so you can edit again. Restore Original Audio returns the clip to its recording. The applied audio plays even on a Mac without the editor installed. If your editor is missing from the list, click Rescan.
Play from another point #
Pause playback, finish any plugin edit and turn off software input monitoring. Click a position in the timeline ruler, wait for preparation to finish, then press Play. The session plays from that position with its saved effect sound ready. Cancel or ■ Stop withdraws a pending move. Open a native plugin window again if it closed during the move.
The same workflow is available through the playback tools: request transport.seek, read session.inspect for the actual position and playbackRequest, then use transport.set. transport.cancelPending cancels the identified request; read its current requestId before cancelling. See Transport and navigation.
Tips #
- Every plugin you add, remove, move or change is one step in Edit > Undo.
- If a plugin does not appear, check its format and folder, then click Rescan. See Troubleshooting.