

Head Chef 1 User Guide · Chapter 4
The workspace
This chapter shows you around the Head Chef window, so you know where each control lives and how to arrange the screen for the job in front of you. It covers Studio and Jam, the Arrange and Mix views, the toolbar and menus, the side lists, track and waveform sizes, separate windows and the status bar.
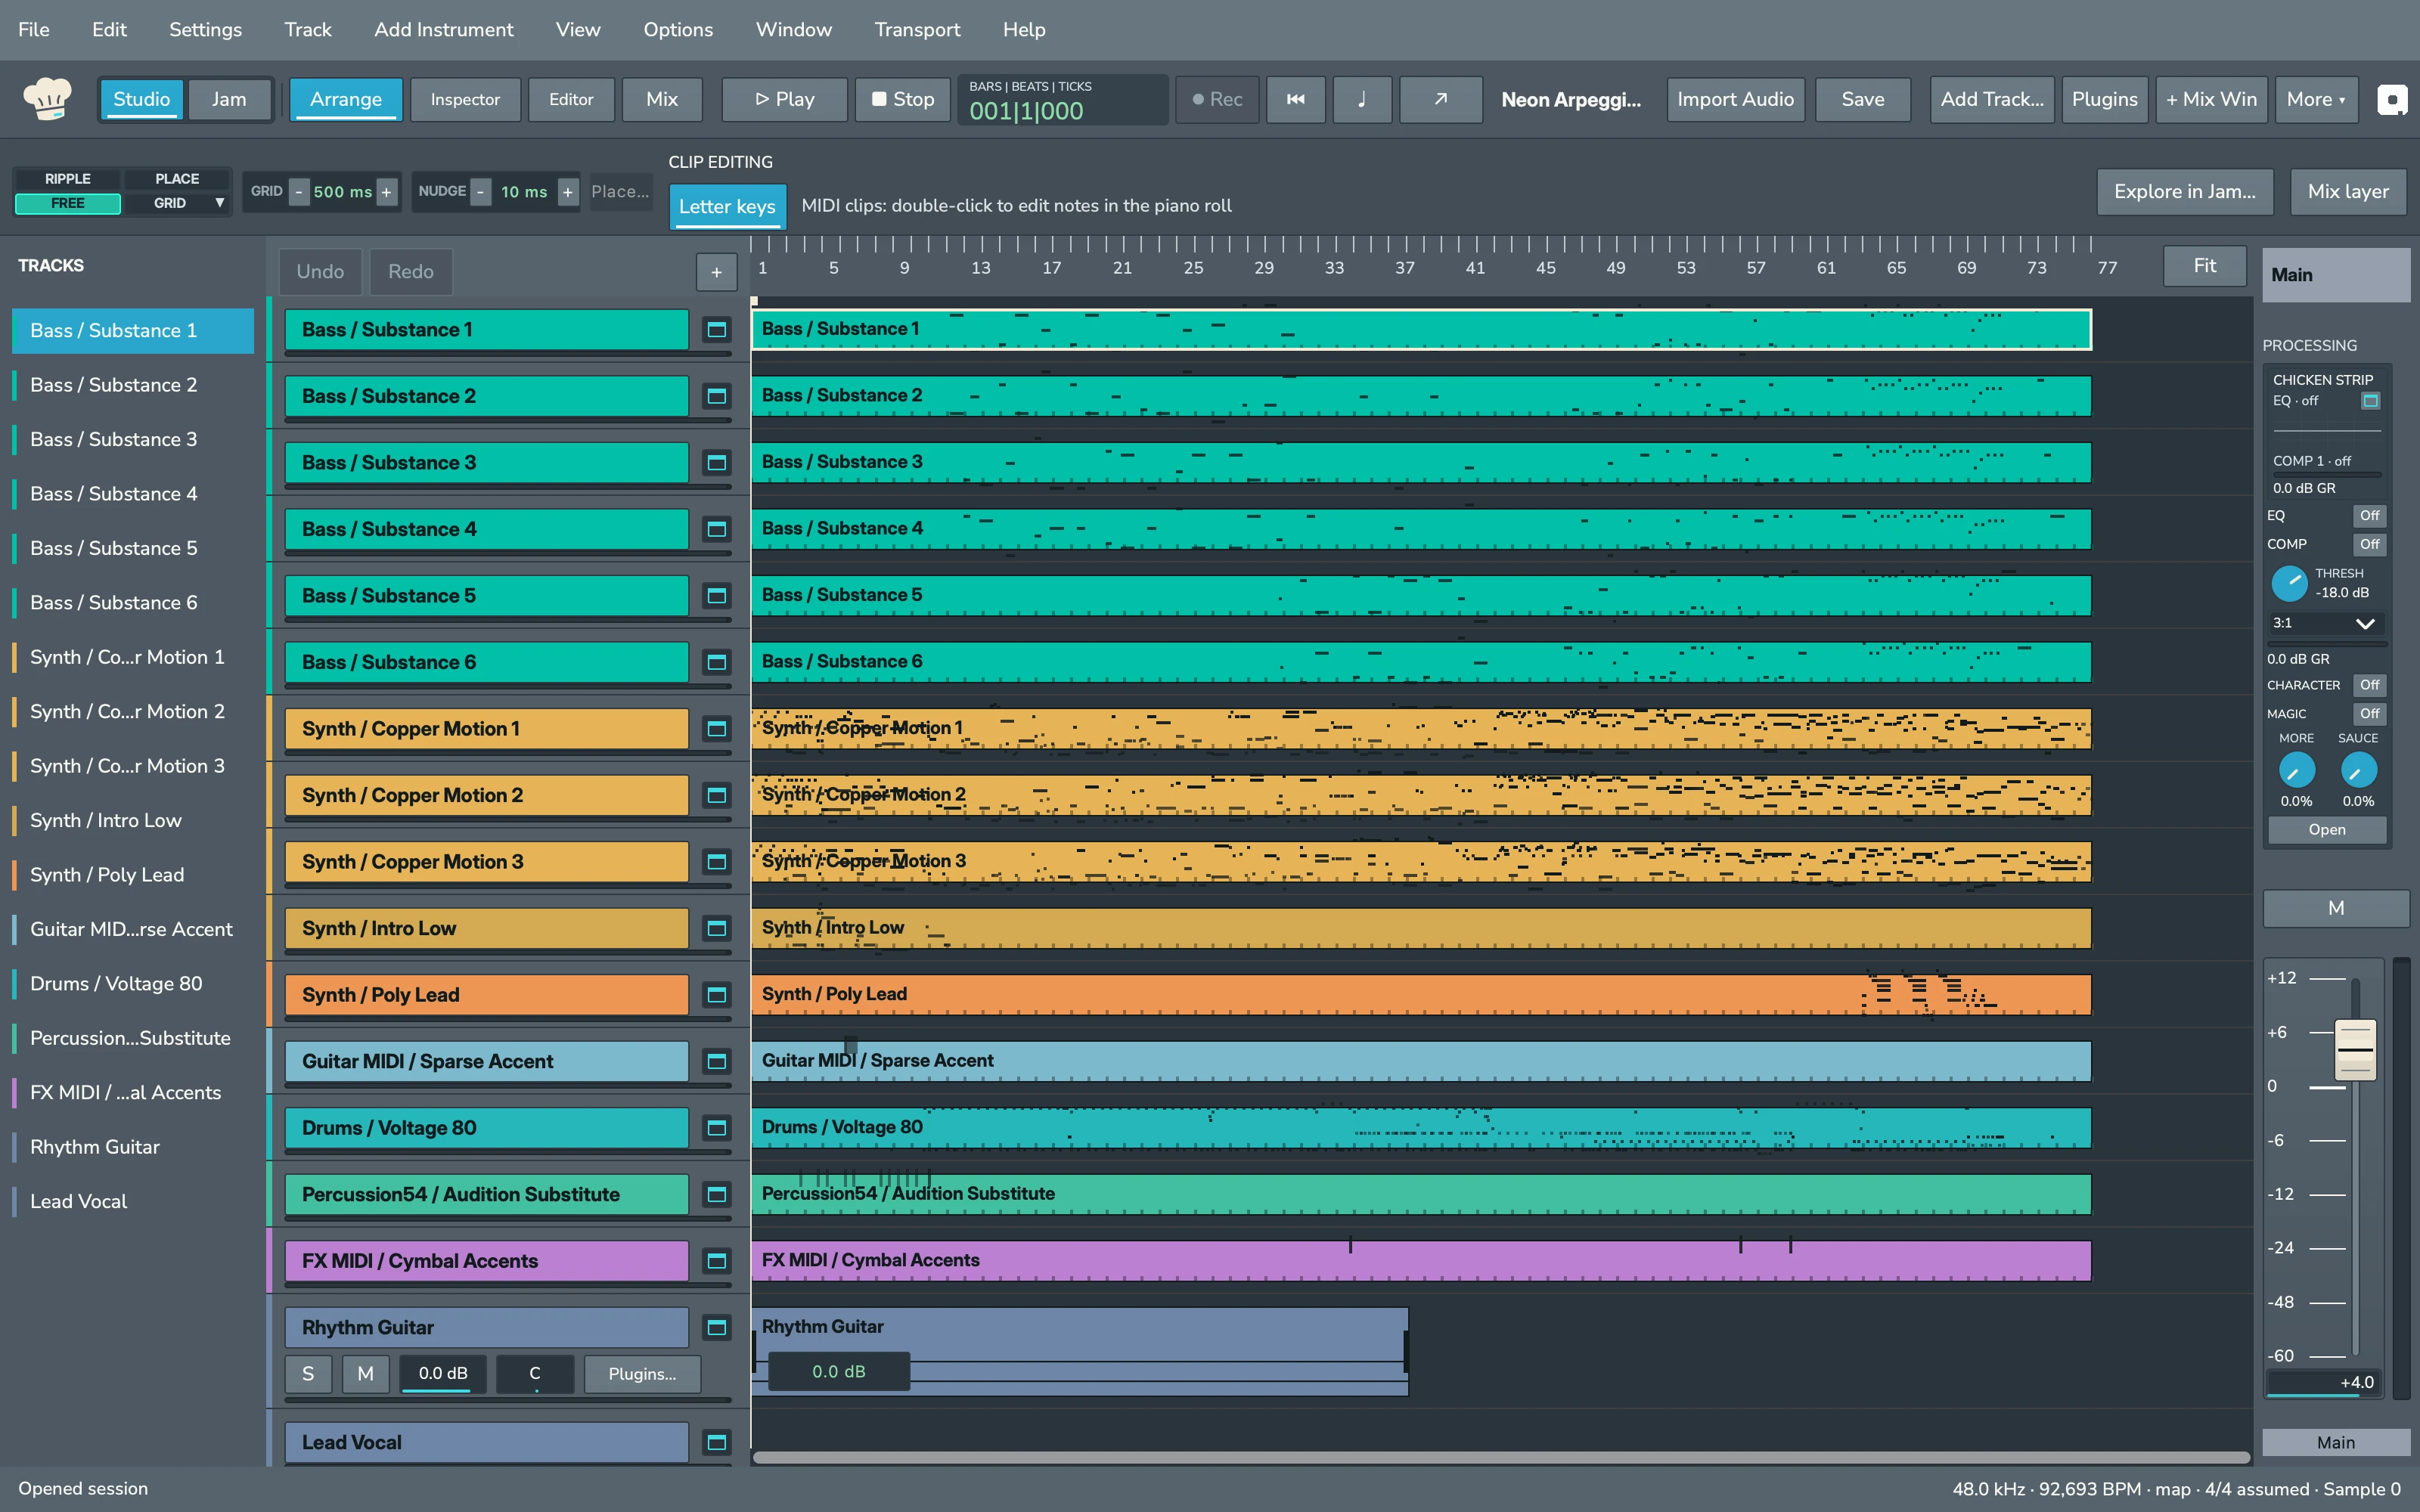
Studio and Jam #
Studio and Jam have separate windows. Click Jam ↗ at the left of the Studio toolbar to open Jam.
- Studio is where you arrange, edit and mix a session. It holds the Arrange and Mix views.
- Jam is a sketchpad for musical ideas. Its window has Studio, ▶ PLAY, Your jams, + New Jam, Save Jam and the Studio transfer button. You can jam without an open session or Studio window. See Jam.
Switch between Arrange and Mix #
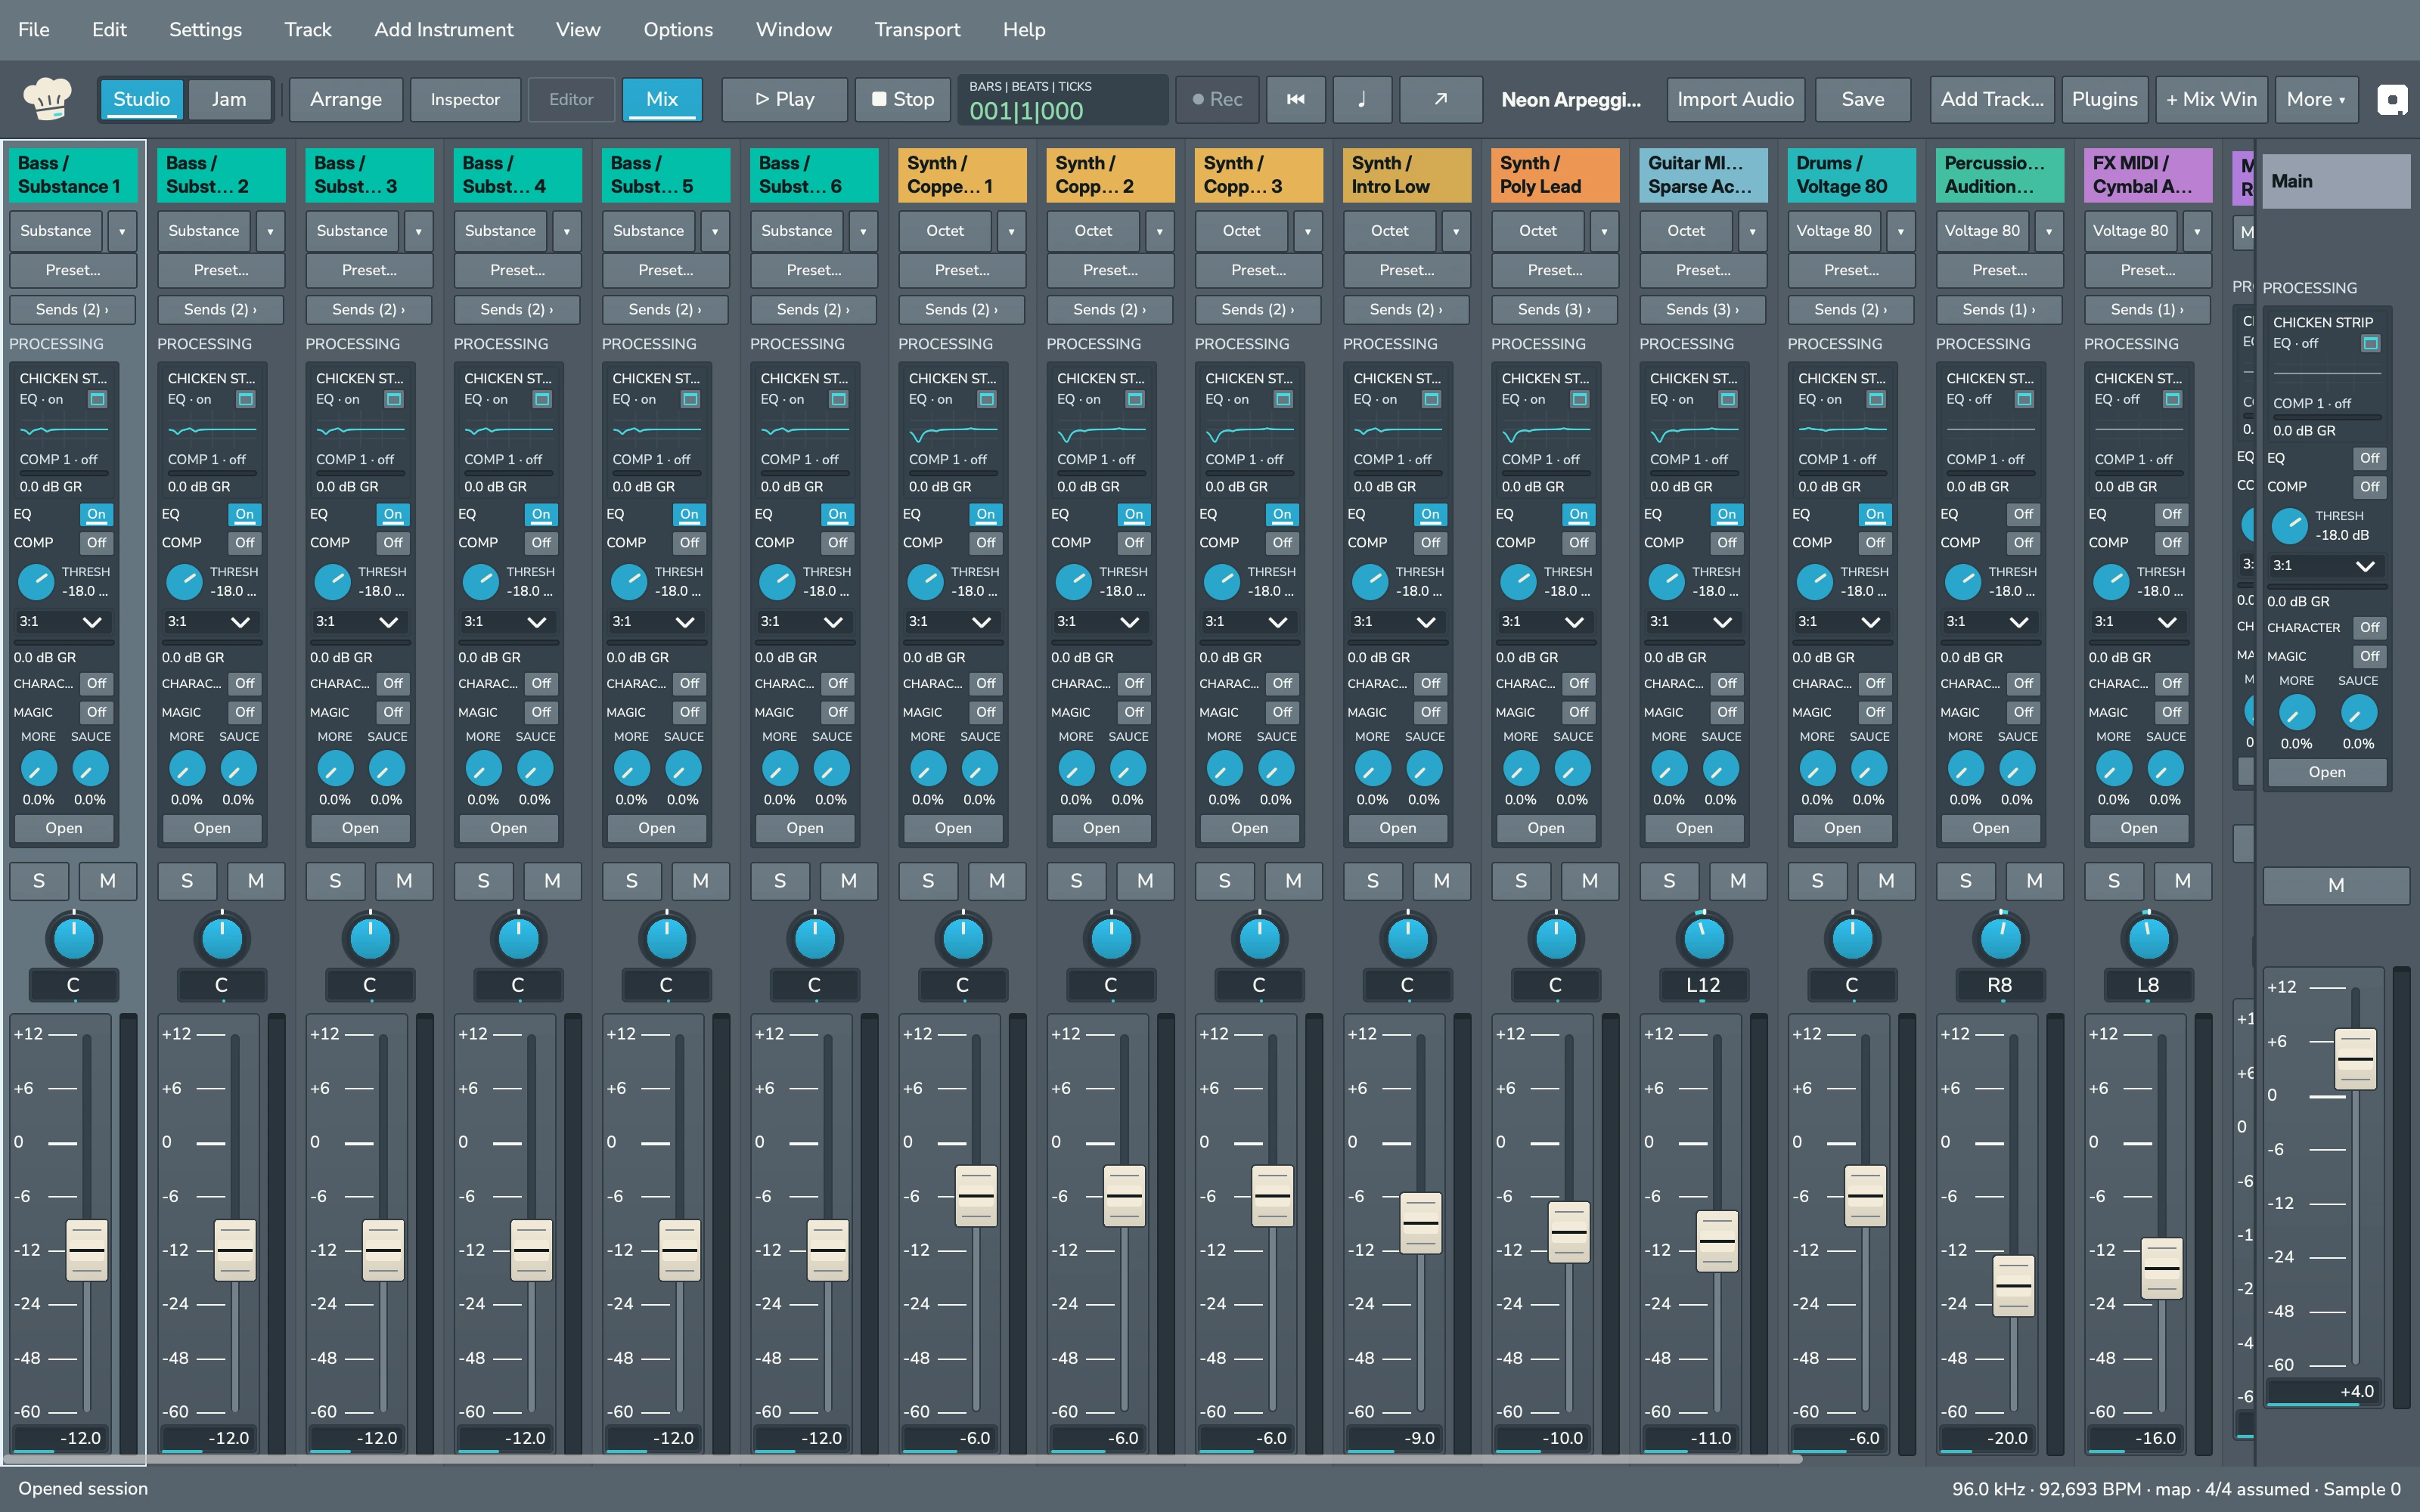
In Studio, click Arrange or Mix in the toolbar, choose View > Arrange or View > Mix, or press ⌘= to switch between them.
- Arrange shows your tracks from top to bottom with their clips along a timeline. Track headers on the left hold each track's name, S (Solo) and M (Mute) buttons and a Plugins… button. The Main output section sits on the right.
- Mix shows a channel strip for each track side by side, with Main on the right. See Mixing.
To put the keyboard back on the Arrange timeline from anywhere, press ⌥⌘1.
Show the Inspector and Editor #
- Click Inspector to show the selected track's channel details beside Arrange or Mix. Click it again, or click Close in the panel, to hide them.
- Click Editor to show the selected clip's details along the bottom of Arrange, including its clip gain. Editor is available in Arrange when a clip is selected.
In narrower windows these buttons show the symbols ◧ (Inspector) and ▤ (Editor).
The toolbar #
The toolbar runs across the top of the window, below the menu bar.
| Control | What it does |
|---|---|
| Chef's hat | Plays the Head Chef sound. See Transport and navigation. |
| Jam ↗ | Opens the separate Jam window. |
| Arrange, Inspector, Editor, Mix | Switches view and shows or hides side panels. |
| ▷ Play and ■ Stop | Start, pause and stop playback. |
| Clock | Shows the cursor position. Click to change its format. |
| ⏺ Rec | Gets a recording ready. See Recording audio. |
| ⏮, ⏪, ⏩ | Go to Start, rewind and forward two seconds. |
| ♩ | Turns the metronome click on or off. Right-click for its settings. |
| Deck ↗ | Opens or closes the Floating Transport. |
| Session name | Shows the session name, with a dot when there are unsaved changes. |
| Import Audio | Imports audio files. See Importing. |
| Save | Saves the session. |
| Add Track… | Adds a track. See Tracks. |
| Plugins | Shows or hides the plugin browser. See Plugins. |
| + Mix Win | Opens the Mix Window. |
| MIDI | Shows MIDI keyboard input settings. See MIDI and instruments. |
| + Region Ed | Opens the Region Editor Window. |
Transport buttons are described in Transport and navigation.
Use the More menu #
When the window is too narrow for every toolbar button, Head Chef shortens some labels and moves the extra buttons into a More ▾ menu (shown as ⋯ in very narrow windows). Depending on the width, the menu holds Add Track…, Plugins, Mixer Window, MIDI Keyboard… and Region Editor Window. A dot after an item means that window or panel is open. Jam ↗ stays at the left of the toolbar.
At narrower widths the rewind and forward buttons leave the toolbar. They stay available in the Floating Transport and on the keyboard.
The edit toolbar #
In Arrange, a second bar sits below the toolbar. It holds:
- the edit mode buttons (RIPPLE, FREE, PLACE and GRID) with the grid and nudge sizes. See Editing audio;
- Letter keys, which turns the Arrange letter shortcuts on or off. See Keyboard shortcuts;
- Explore in Jam…, which opens a transfer review; see its current limits;
- Mix layer, which shows mixing controls on each track in Arrange.
The menus #
| Menu | What you find there |
|---|---|
| File | New Session…, Import Audio…, Open Session…, Save Session, Save Session As…, Render Mix… and Close. |
| Edit | Undo and Redo. |
| Settings | Session Settings…, Audio Engine… and Control Surface…. |
| Track | Add Track (with Add Mono Audio Track and Add Instrument Track) and Add Effect Return. |
| Add Instrument | One item for each built-in instrument: Voltage 80, Voltage 78, Substance, Octet and Mini Bar. |
| View | Arrange and Mix, side panels and overlays, zoom and fit, track heights and waveform size. |
| Options | Tape Scrub Sound, Arrange Letter Shortcuts (A–Z), Count-In and Metronome Click. |
| Window | Mix Window, Region Editor Window, Floating Transport and Open Multi-Window Studio Workspace. |
| Transport | Play, Stop and Record. The first item's name changes with what it will do, such as Pause or Start Recording. |
| Help | Head Chef 1 User Guide and Keyboard Shortcuts…. |
The View menu also holds Arrange Mix Layer, Clips, Plugin Browser, Clip Gain Badges and Clip Gain Line. A check mark shows each one that is on.
You can also right-click in many places. Right-click a track header for Track Actions such as Toggle Solo, Toggle Mute, Reset Gain to 0.0 dB, Reset Pan to Center and Track Height. Right-click the empty area below the track headers, or empty space in Mix, to add a track.
The Tracks list and Clips list #
When the window is wide enough, a TRACKS list runs down the left edge of Arrange. Click a name to select that track. You can drop a plugin from the plugin browser below the list to create a new track.
To show the CLIPS list on the right of the timeline, choose View > Clips. Each row names a track's clip and shows its length, its note count for an instrument track, or Empty. Click a row to select that clip. The Clips list needs a wide window; if you do not see it, widen the window.
Change track heights #
Each Arrange track can be one of six heights: Micro, Tiny, Small, Medium, Large and Jumbo. Taller tracks show more of the waveform or notes and more controls in the header.
To set one track directly:
- Right-click the track header.
- Choose Track Height, then a size.
To step through the sizes:
- View > Taller Selected Track or ⌘↑ and View > Shorter Selected Track or ⌘↓ change the selected track.
- View > Taller All Tracks or ⌥⌘↑ and View > Shorter All Tracks or ⌥⌘↓ change every track together.
Track heights are part of the session, so Edit > Undo restores the previous height.
Magnify waveforms #
Quiet recordings can be hard to see. Choose View > Taller Waveforms to magnify audio waveforms in Arrange, up to 16 times. Choose View > Shorter Waveforms to step back. The shortcuts are ⌥⌘] and ⌥⌘[.
Magnifying changes only the picture. What you hear does not change.
Open separate windows #
Head Chef can spread your work across several windows, for example across two displays. Choose these from the Window menu:
- Mix Window opens the mixer in its own window, titled with your session name. It has its own Stop and Record buttons and clock. Click Dock to close it and show Mix in the main window. Shortcut: ⇧⌘=.
- Region Editor Window opens the selected clip in its own window: the piano roll for a MIDI clip, or the audio clip editor for an audio clip. It follows your clip selection. Click Close to hide it.
- Floating Transport opens a small transport window that stays on top of other windows, with two clocks and the transport, Count-In and Click buttons. Shortcut: ⌘ Num 1 (the 1 key on the numeric keypad).
- Open Multi-Window Studio Workspace shows Arrange in the main window and opens the Mix Window and Floating Transport together.
Instrument and plugin windows also open separately. They stay linked to the track they belong to, so you can keep several open while you work. See Plugins.
Jam always uses its own window, opened with Jam ↗. It can stay open when Studio closes. In Jam, click Studio to bring Studio forward; both windows remain available.
To close the window you are working in, press ⌘W or choose File > Close. In the main window, Head Chef asks first if you have unsaved changes.
The status bar #
The bar along the bottom of the main window tells you what just happened and where you are.
- On the left, Head Chef shows the last action, such as Added instrument, or Ready. While a clip edit is in progress it shows how to apply or cancel it. Playback and recording progress, such as Preparing playback…, also appears here, with a Cancel button when you can stop it.
- Messages that need your attention appear in amber with a Dismiss button. An audio import shows its progress and a Cancel import button.
- The keyboard readout shows where computer keys currently go, such as Keys: Arrange, Keys: Mix, Keys: Piano roll or Keys: Text entry. It follows the active window and control, independently of the selected track. Keys: Controls means a button or another control has focus.
- With an audio track selected while stopped, the bar can show the next recording setup step beside the last action. Errors, imports, live edits, playback and recording progress take priority over this hint.
- On the right, Head Chef shows the session sample rate, tempo and time signature, and the cursor position in samples, for example Sample 96,000. In narrow windows only the sample rate and position fit. In very wide windows the rate, tempo and time signature move up into the toolbar.
- After you start a render, a Rendering… or Render Result button appears. See Rendering.
Language and number formats #
Head Chef's menus, dialogs and messages are in English, whatever language your Mac uses. The macOS Open and Save panels follow the same choice.
Numbers follow your Mac's region where that helps reading. Tempo readouts and the cursor position in the status bar use your regional decimal separator and digit grouping, so in a German or Dutch region a tempo of 92.693 BPM reads 92,693 BPM. Level and frequency readouts, such as dB and kHz values, and the numbers you type into value fields always use a period as the decimal point.