

Head Chef 1 User Guide · Chapter 15
Mixing
This chapter helps you turn a set of tracks into a finished mix. You set levels and positions in the Mix view, shape each channel with Chicken Strip and effects, save and reuse channel presets, send channels to shared echo and reverb, and keep the Main channel in good shape.
Open the Mix view and the Mix Window #
- Click Mix in the toolbar, or choose View > Mix. ⌘= switches between Arrange and Mix.
- To mix in a separate window, choose Window > Mix Window, click + Mix Win in the toolbar, or press ⇧⌘=. You can keep Arrange in the main window and place the Mix Window on another display.
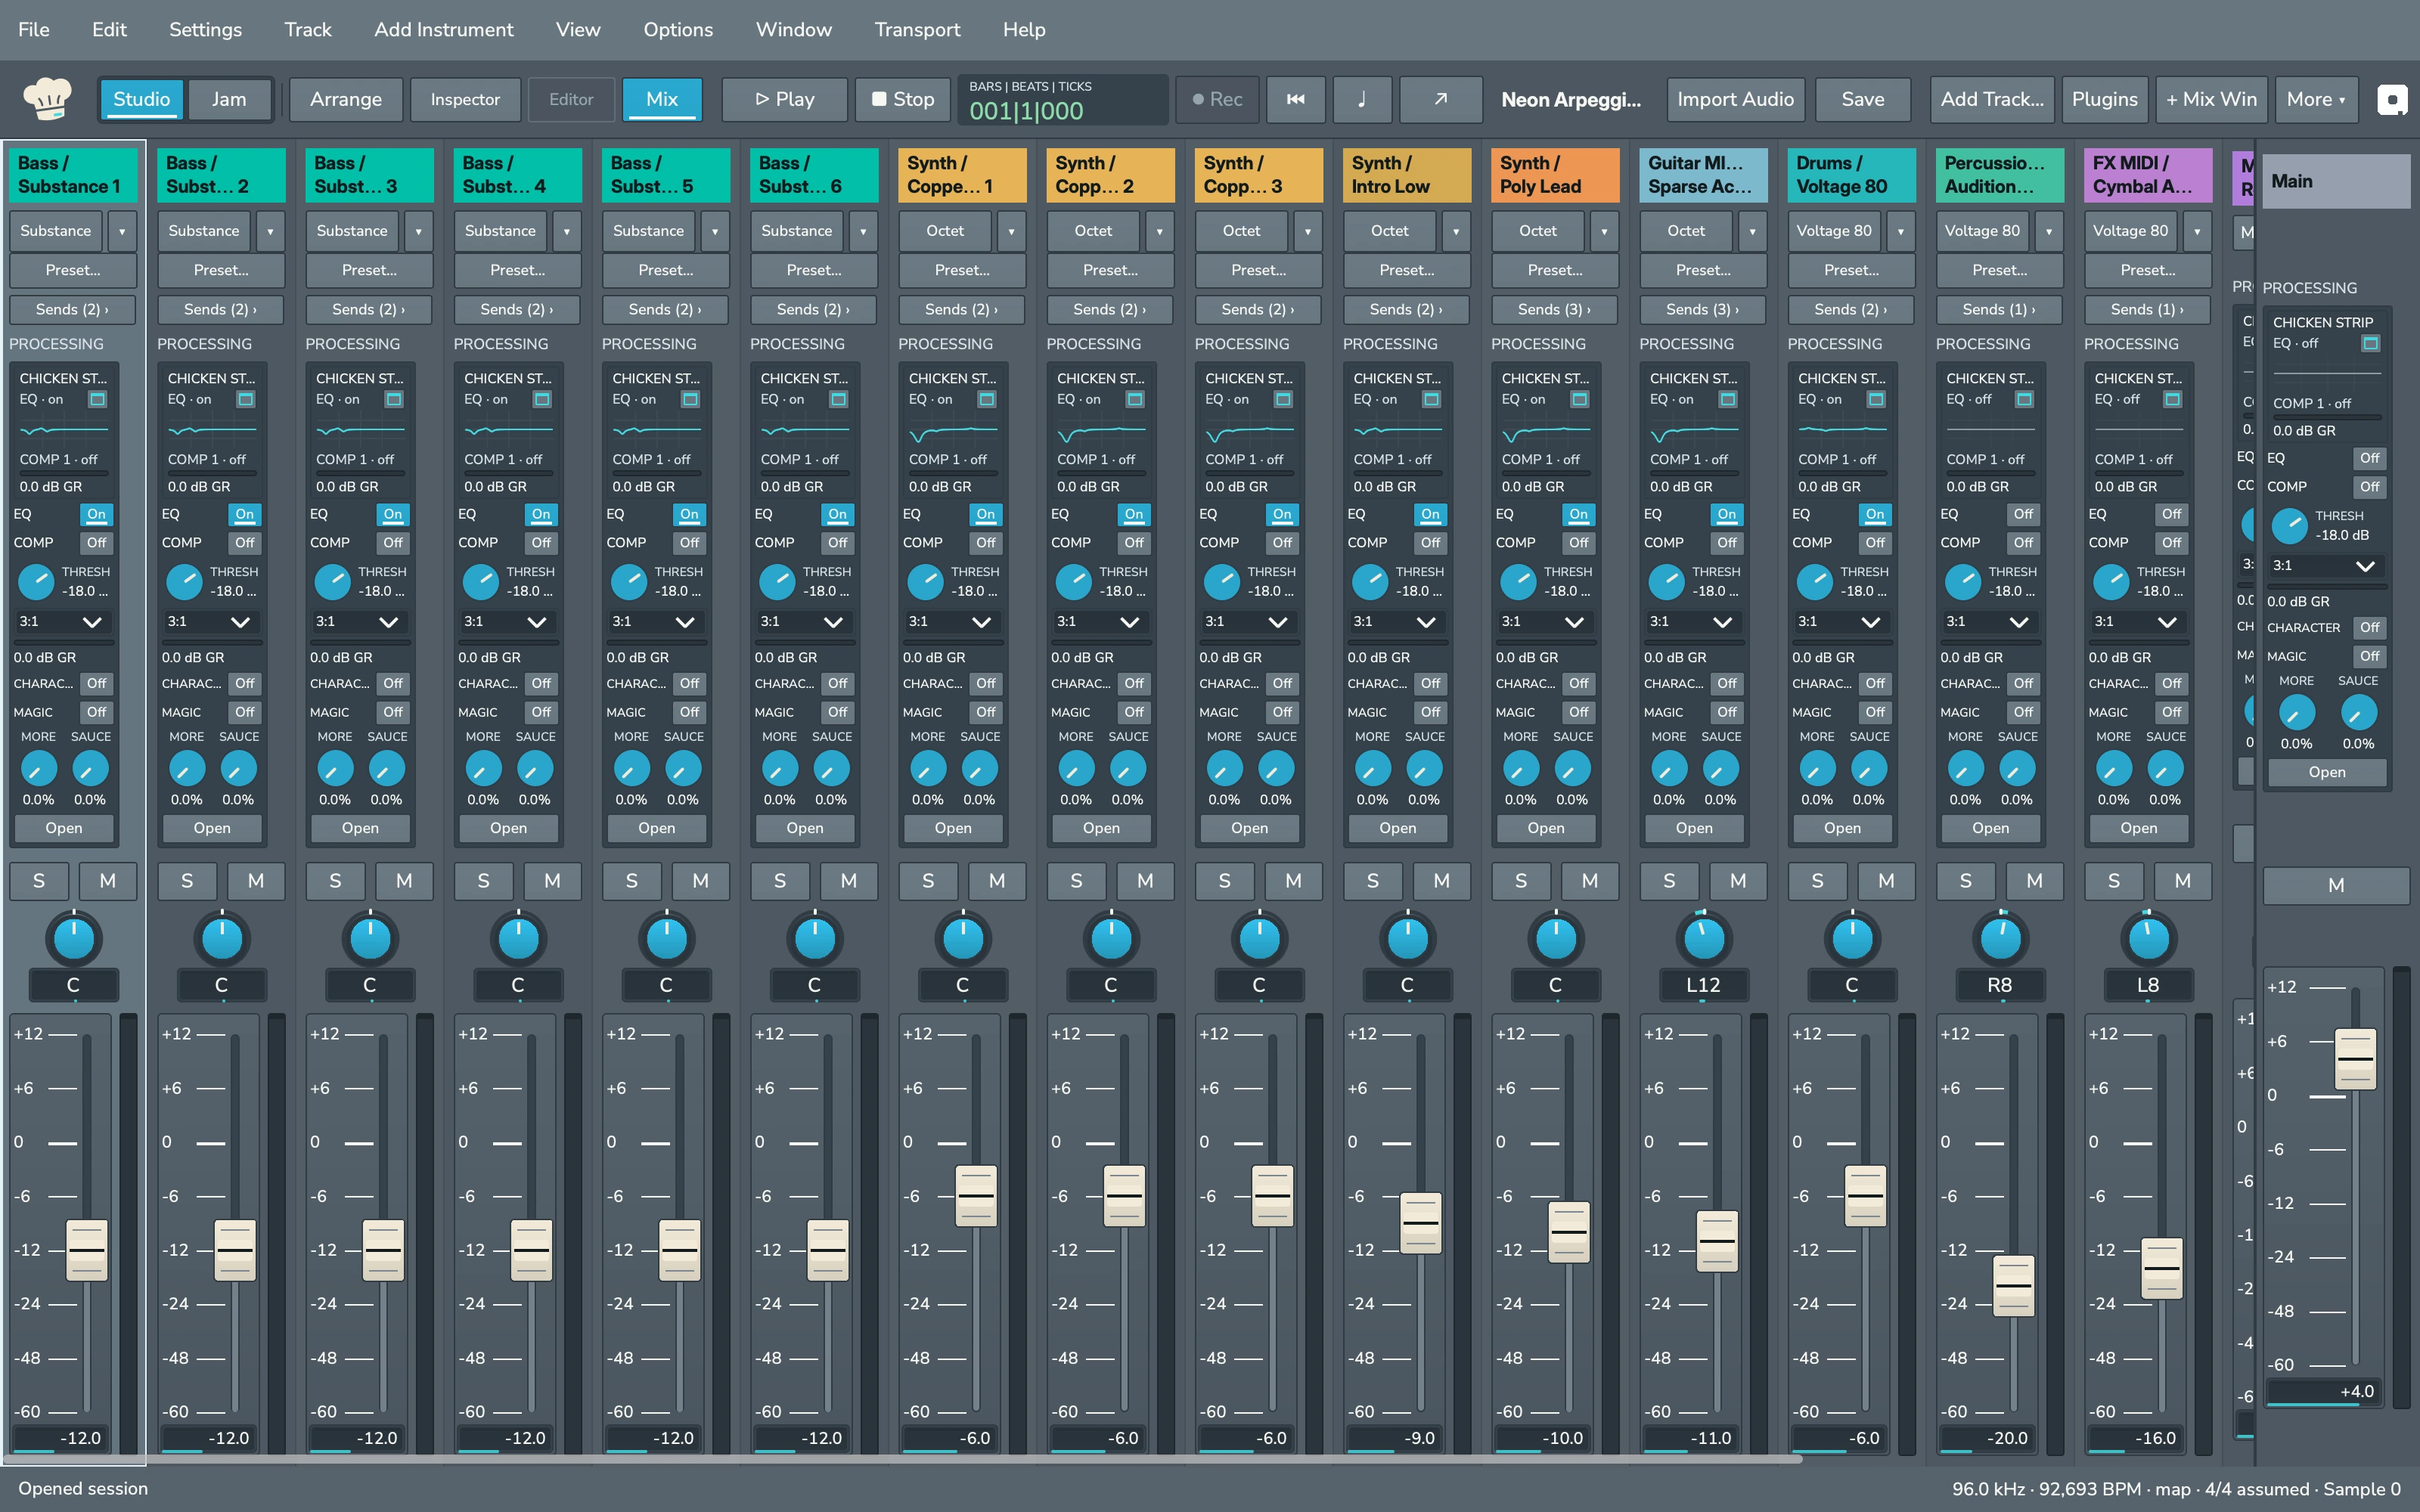
Each channel has a channel strip. The Main channel is pinned at the right edge.
Read a channel strip #
From top to bottom, a strip shows:
| Part | What it does |
|---|---|
| Name | Click to select the channel. |
| Type | INSTRUMENT, AUDIO, AUX RETURN or MASTER. |
| Preset… and source | Channel presets, and the instrument or recording input. |
| Sends | Opens the channel's sends beside its source and processing controls. The count appears in parentheses, for example Sends (2). |
| PROCESSING | Chicken Strip at a glance, plus the channel's effects. |
| S and M | Solo and Mute. |
| Pan knob | Places the channel from left to right. |
| Fader and meter | Sets the level and shows the signal. |
The Chicken Strip summary shows EQ and Compressor 1 status, its response curve and measured gain reduction. Click the summary to open the channel controls, or its small window button to open the full Chicken Strip editor. Main keeps the same summary beside its pinned fader and meter.
Set level, pan, solo and mute #
- Drag a fader to set the channel level, from -60 dB to +12 dB.
- Drag the pan knob to place the channel, from 100 left to 100 right.
- Click S to solo a channel and hear only soloed channels, or M to mute a channel.
To fine-tune, hold ⌘ while you drag. To reset, ⌥-click: a fader returns to 0 dB and pan to center. With a fader focused, press Return to type a value. ⇧S and ⇧M solo and mute the selected track.
The meter turns red at the top when a channel goes over full scale. Click the meter to clear it.
The signal path of a channel #
Sound passes through each channel in a fixed order. Knowing the order tells you, for example, why a send follows the fader and why clip gain changes how hard Chicken Strip's compressor works.
Audio and instrument tracks #
- Source. An audio track plays its clip. An instrument track plays its instrument from the track's notes; on Mini Bar, OUT sets the instrument's level here.
- Clip gain. On an audio track, the clip's gain and gain line set its level before any processing. See Editing audio.
- Processing chain. Chicken Strip and the effects in PROCESSING, from top to bottom, in the order you set. Chicken Strip comes first on a new channel, and you can move it with Up and Down like any effect. An effect that is Off passes the sound through unchanged.
- Fader, pan and mute. The fader sets the level from -60 dB to +12 dB, pan places the sound, and M silences the channel. The bottom of the fader is -60 dB, not silence; use M to silence a channel.
- Meter. The channel's meter shows the level after the fader and pan.
- Solo. When any channel is soloed, the channels that are not soloed stop playing to Main.
- Sends. Each send takes the sound after the processing, fader, pan and mute, and feeds it to an Effect Return at the send's level.
- Main. The channel plays into the Main channel.
Audio tracks and the Substance instrument are mono; the other instruments are stereo. A mono channel is placed between the speakers with the session's pan depth (see Tempo and session settings). A stereo channel, including a stereo clip from an imported file, uses pan as a balance control: at center both sides play at full level, and turning toward one side lowers the other. A mono channel becomes stereo at its first effect or plugin, so a chorus or reverb on a mono track adds stereo width before the fader. Pan on that channel still follows the pan depth, which lowers both sides by the pan depth at center.
Effect Returns #
- Input. The sum of every send that feeds the return.
- Processing chain. Chicken Strip, then the return's effect, then any effects you add. The return's effect plays only its processed sound, except Char Press, whose own Mix control sets how much of the dry sound passes. Turning the return's effect Off passes the dry sound of the sends.
- Fader, pan and mute. Pan works as a balance control.
- Meter, after the fader.
- Main. The return plays into the Main channel.
An Effect Return cannot send to another return, and a session holds up to four.
Main #
- Input. The sum of every track and Effect Return.
- Processing chain. Main's Chicken Strip and any effects you add.
- Fader and mute. Main has no pan and no solo.
- Metronome. The click joins after the Main fader, so the fader does not change its level and Render Mix leaves it out.
- Meter, after the fader.
- Output. Main plays on the first two outputs of the device chosen in Settings > Audio Engine…. See The Main channel and headroom.
Render Mix renders this same path, from every source through Main, without the click. See Rendering your mix.
Inside Chicken Strip #
Chicken Strip has its own fixed order: input gain and polarity, gate, the two compressors and the graphic EQ, character and analog magic, secret sauce, output trim, and a limiter that is off until you turn it on. Its compressors can sit before the EQ (the starting setting), either side of it, or after it; choose this in the full Chicken Strip panel. A new Chicken Strip has every section off, so it passes the sound unchanged until you turn something on.
Solo and the Effect Returns #
Solo in Head Chef works in place and keeps the effects you hear on a soloed track. When you solo a track, the Effect Returns it sends to stay audible and play only that track's sends. When you solo an Effect Return, you hear only the tracks that feed it, through the return. Meters on channels silenced by solo still move, because they read the level before the solo stage.
Delay compensation #
Some effects delay the sound they process. Head Chef measures the delay of every effect and Chicken Strip on every channel and lines the channels up automatically with delay compensation, so tracks, returns and Main stay in time. There is nothing to set. Turning an effect Off keeps its delay, so the timing does not jump when you switch it.
Work in the Inspector #
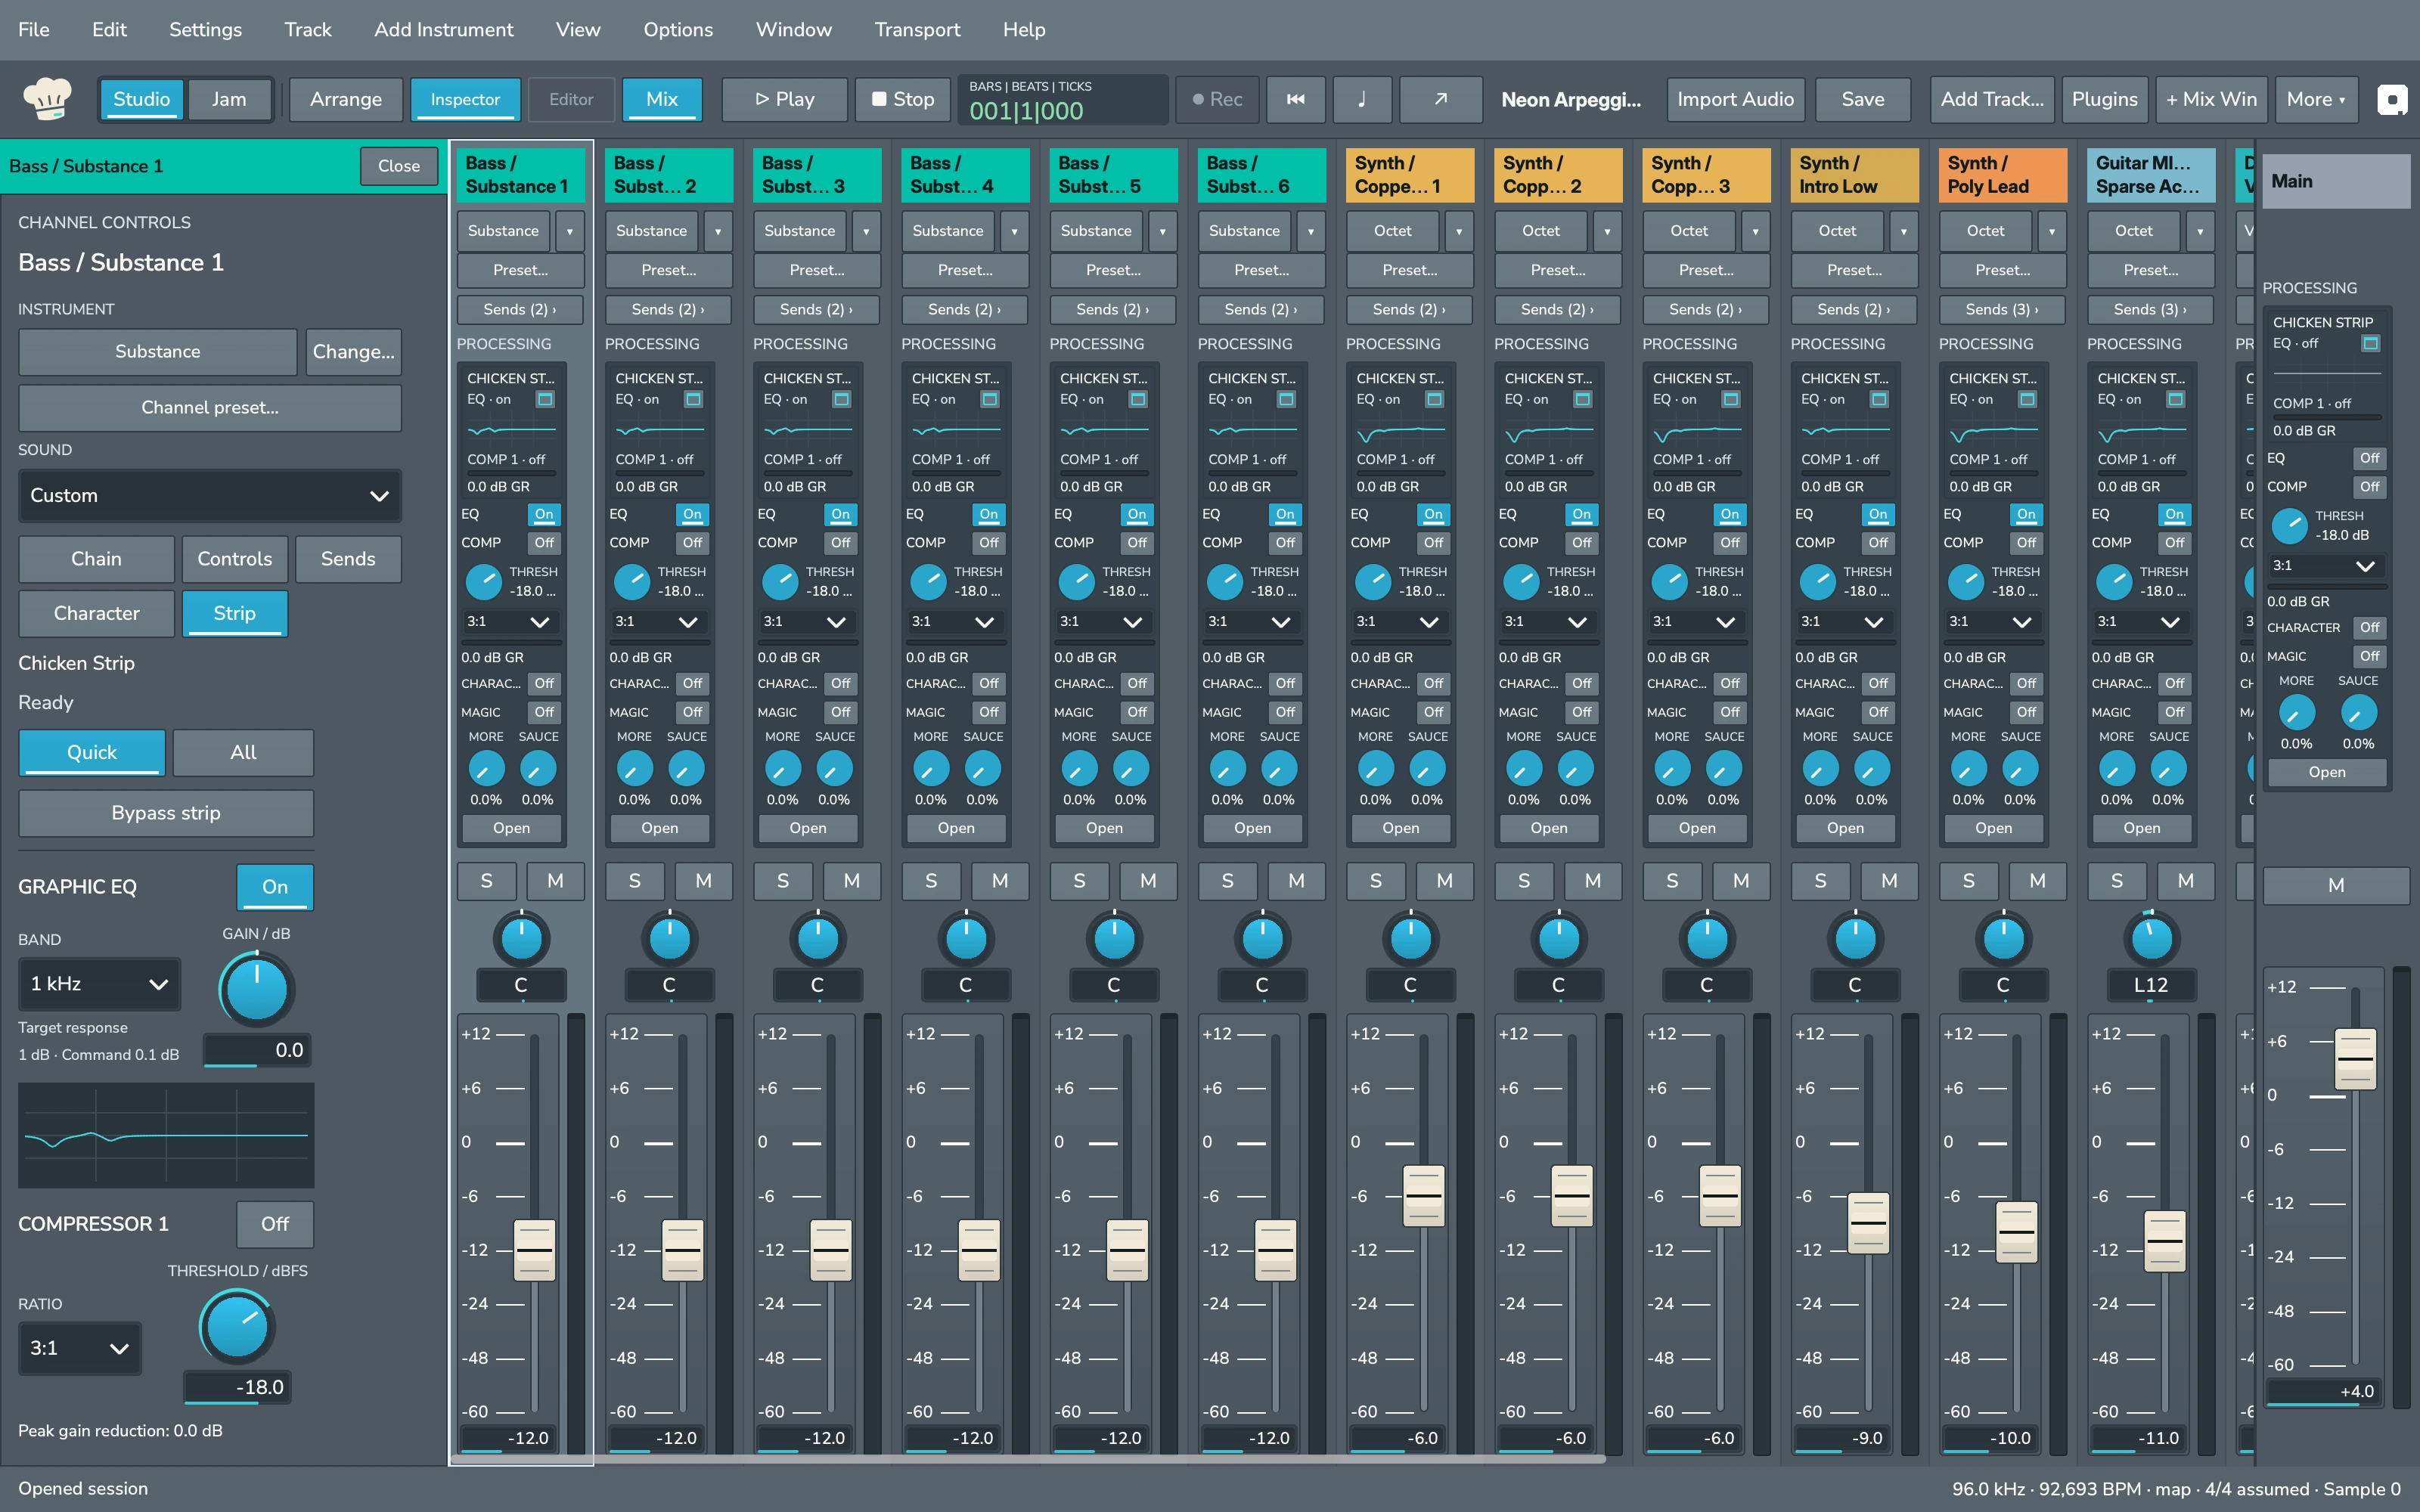
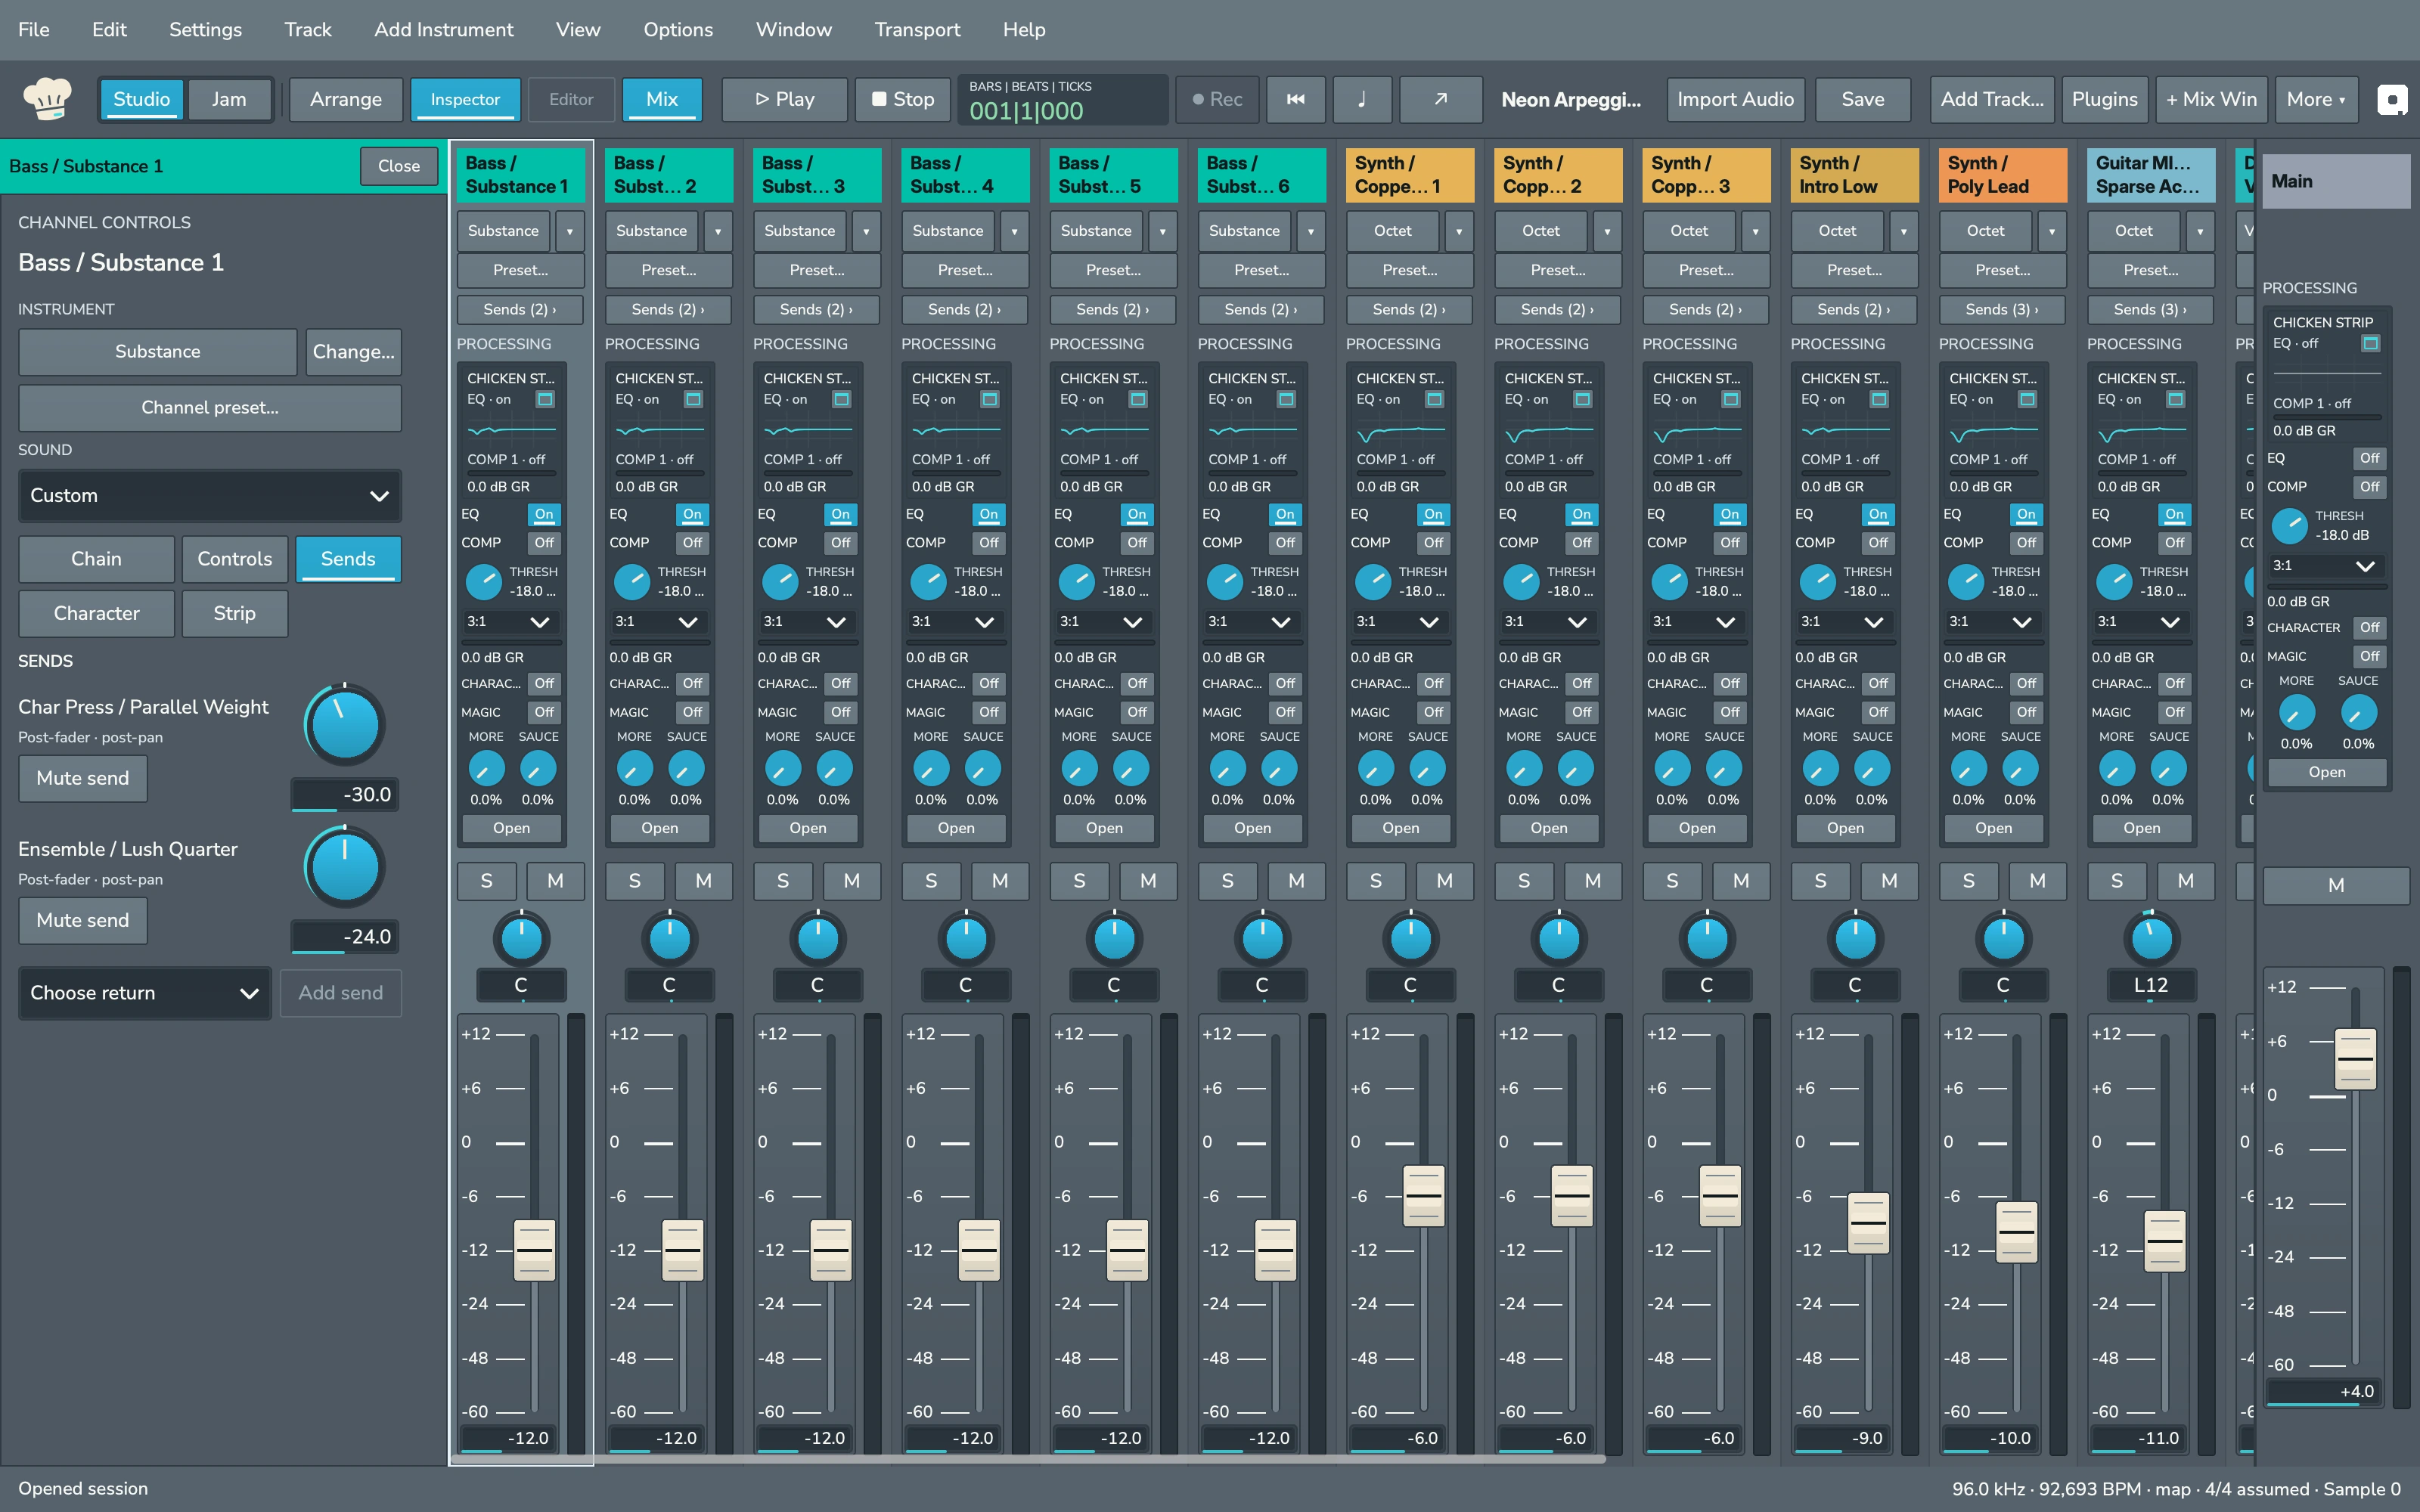
The Inspector shows every control for the selected channel. Click Inspector in the toolbar, a strip's processing area, or Sends above its processing controls. In Mix it opens on the left. Click Close in its header to hide it.
The Inspector has these tabs:
- Chain: the ordered list of processing on the channel.
- Controls for an instrument, or Effect for an Effect Return.
- Sends: the channel's sends.
- Character: Chicken Strip's coloring controls.
- Strip: Chicken Strip's EQ and compressor.
Shape the sound with Chicken Strip #
Every channel, including Effect Returns and Main, starts with Chicken Strip, the bitsnacks channel strip. On each Mix strip you see its main controls: EQ and COMP on and off, the THRESH dial, the ratio list, the GR gain reduction readout, CHARACTER and MAGIC on and off, and the MORE and SAUCE dials. Open shows Chicken Strip in the Inspector, and double-clicking the summary at the top opens the full Chicken Strip panel.
For more room, open the Inspector's Strip tab:
- Click Quick for the essentials. Bypass strip turns the whole strip off while keeping its settings.
- Under GRAPHIC EQ, turn the EQ on, choose a BAND and set its GAIN / dB.
- Under COMPRESSOR 1, turn the compressor on, choose a RATIO and set the THRESHOLD / dBFS. Peak gain reduction shows how much it is working.
- Click All to see every Chicken Strip control.
The Character tab holds CHARACTER, ANALOG MAGIC with its MORE amount, and SECRET SAUCE, which adds low-end weight that follows the bass in the channel. Open full strip opens the full panel. Sections you turn off keep their settings, and you can adjust Chicken Strip while the session plays.
Build the processing chain #
Sound flows through the PROCESSING list from top to bottom. Open the Inspector's Chain tab to change it.
- Click + Built-in Effect to add MADRE Chorus, Voltage Spaces or Char Press at the end of the chain.
- Click + Third-party Plugin to add one of your plugins. See Plugins.
- Click + Insert above on any item to add an effect before it.
- Use Up and Down to reorder, On and Off to bypass an item, Open to show its controls, and Remove to take it out.
Chicken Strip can move and be bypassed but not removed. On a Mix strip, the same actions are under + Effect, + Plugin and the … menu of each item. Each insert processes the whole channel signal.
Use channel presets #
A channel preset stores Chicken Strip, the processing chain with each effect's settings and bypass state, and for instrument channels the instrument and its sound.
- Click Channel preset… in the Inspector, or Preset… on a strip.
- Choose a preset and click Use preset.
Head Chef includes these factory presets:
| Preset | Description |
|---|---|
| Late Night Tine | Tine keys with gentle compression, light colour and a short dark room. |
| Glass Echoes | Glass Keys with restrained brightness and dotted eighth-note echoes. |
| Concrete 80 | Tight Current drums with punch-focused compression and mostly dry Char Press colour. |
| Room 78 | Warm Room drums with gentle compression and a compact Natural room. |
| Focused Bass | Substance bass with controlled low mids and restrained Char Press weight. |
| Velvet Strings | Octet Night Choir strings with light compression and a soft Lush space. |
| Slow Glass Pad | Octet Glass Current pad with a broad, slowly moving Lush space. |
| Warm Audio | Gentle tone shaping, soft compression, light colour and a short room for audio. |
The list shows instrument presets on instrument channels and audio presets on audio channels. To keep your own, click Save channel preset…. Head Chef saves a .headchefchannel file, which you can bring back with Load preset file…. To start a new track from a preset, use From preset… in the Add Track dialog.
Send to an Effect Return #
An effect return is a channel that holds one shared effect. Several channels can feed it through a send.
- Choose Track > Add Effect Return, then Voltage Spaces, MADRE Chorus or Char Press. A session holds up to four Effect Returns.
- Select a channel you want to send, and open the Inspector's Sends tab.
- Choose the return from Choose return and click Add send.
- Turn the send's level dial, from -60 dB to +12 dB. Mute send silences it.
Sends are post-fader and post-pan, so they follow the channel's fader. In the Plugin Browser, + Return on an effect card creates a return and Send adds a send from the selected channel.
To edit the return's effect, click the effect name on its strip, or select it and open the Effect tab. An effect on a return plays only its processed sound, so you balance the effect with the return's fader.
Echo that follows tempo #
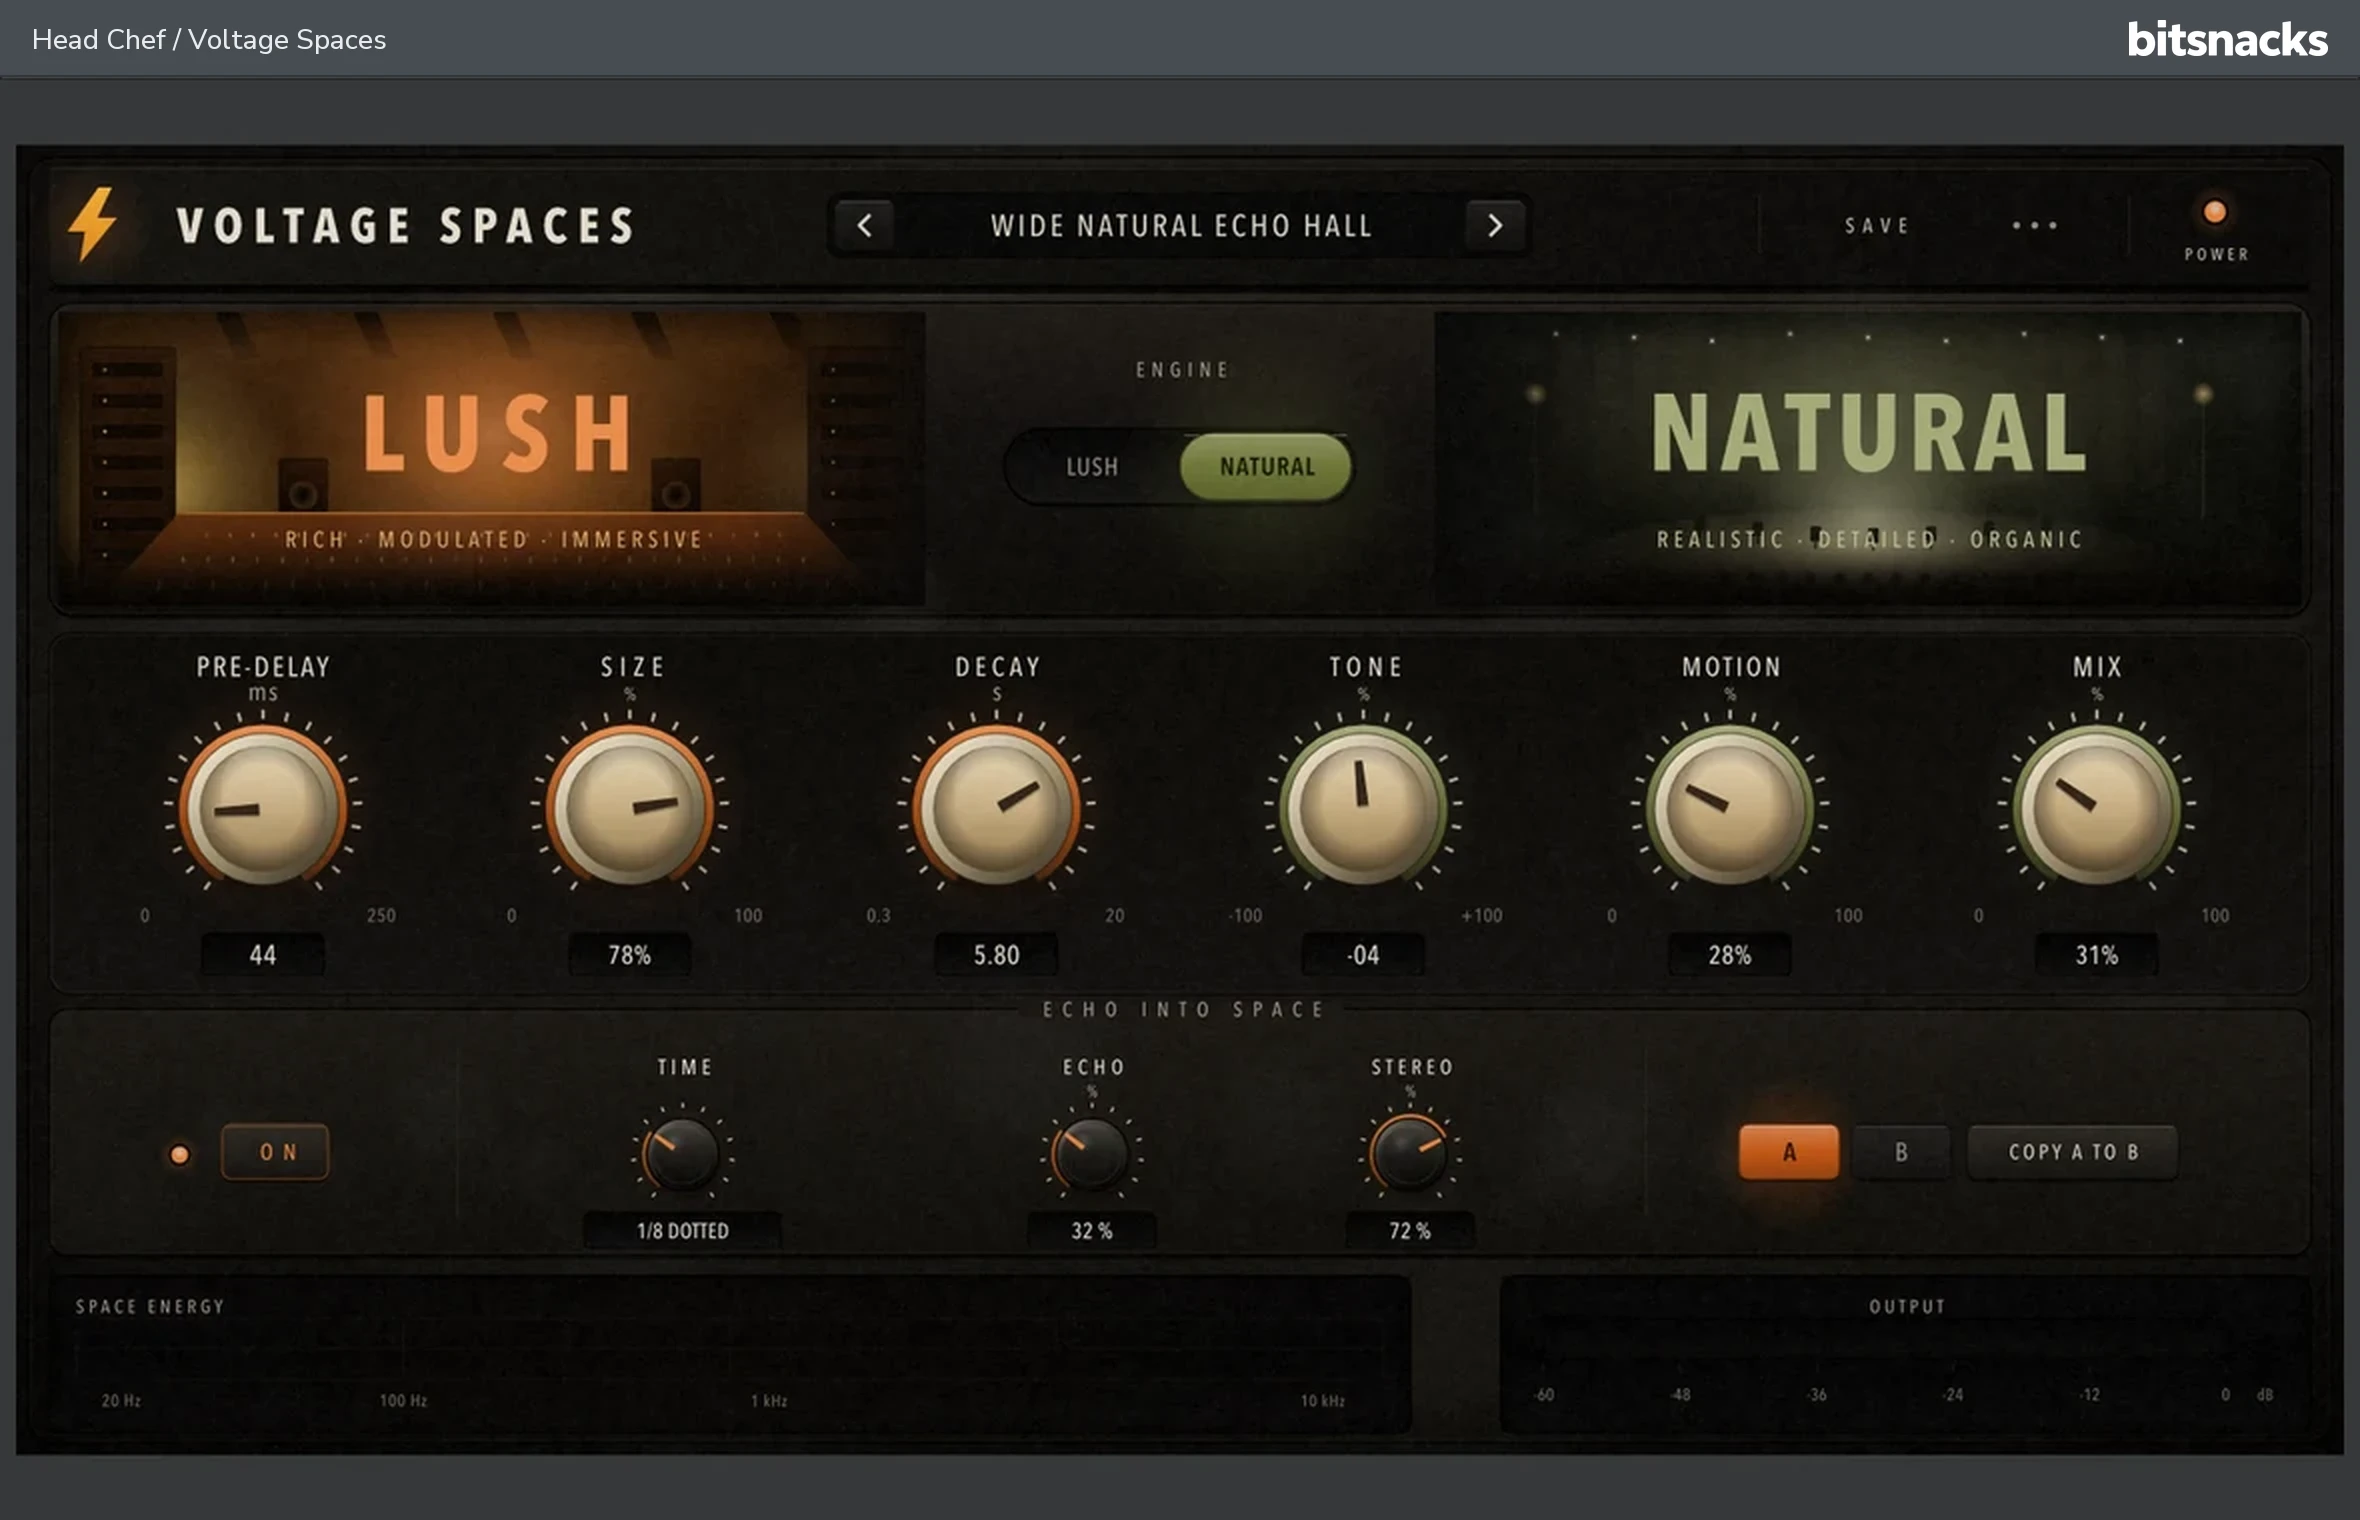
Voltage Spaces adds reverb and an echo that can lock to your session tempo.
- Select a Voltage Spaces return and open the Effect tab, then click All.
- Turn on Echo On and Echo Sync.
- Choose an Echo Division, such as 1/8 or 1/16, including triplet (T) and dotted (D) values.
- Set the Echo amount.
With Echo Sync on, echoes follow the session tempo, including tempo changes. The Inspector shows Echo timing: session tempo map. or Echo timing: session tempo. Turn Echo Sync off to set Echo Time in milliseconds instead. To set the tempo, see Tempo and session settings.
The Main channel and headroom #
Every channel and Effect Return feeds the Main channel, the main bus. Its strip, labeled MASTER, has a fader, a mute button, a meter and its own Chicken Strip.
Inside Head Chef, channels and Main carry levels above full scale without clipping, so a hot channel does not distort inside the mix. Your audio interface clips, though, and fixed-point WAV formats cannot hold levels above full scale. Keep the Main meter out of the red to leave headroom: lower the Main fader or the loudest channels. Head Chef renders with the same mix engine you hear. See Rendering.
Mix in Arrange #
The Arrange Mix Layer puts Chicken Strip controls on each track in Arrange.
- Choose View > Arrange Mix Layer, or click Mix layer in the clip editing bar.
- Each track shows IN / dB, the EQ switch and band controls, the COMP 1 switch with threshold and ratio, the gain reduction readout and OUT / dB.
On short tracks, click Chicken Strip… to reach the controls. Choose the menu item or click Mix layer again to hide the layer.
Tips #
- Every mix change is one step in Edit > Undo.
- The Inspector follows the selected channel in Arrange and Mix.