

Head Chef 1 User Guide · Chapter 17
Rendering your mix
When your mix is ready, Render Mix writes the whole song to one stereo audio file that you can share, master or upload. You can also write separate audio or MIDI files for chosen tracks. This chapter explains rendering, file format, sample rate, bit depth, dither, tails, progress and file results.
Render your mix #
- Choose File > Render Mix… or press ⌥⌘B.
- In the Render Mix window, keep Source set to Whole mix, then choose the File type, Sample rate, Sample format, Dither and Tail / seconds described below. The window shows your session's name at the top.
- Click Choose Output….
- Type a new file name, choose a folder and click Save.
The progress window opens and shows the render's status. When it reads Mix rendered, the file is complete, and the window shows where it was saved.
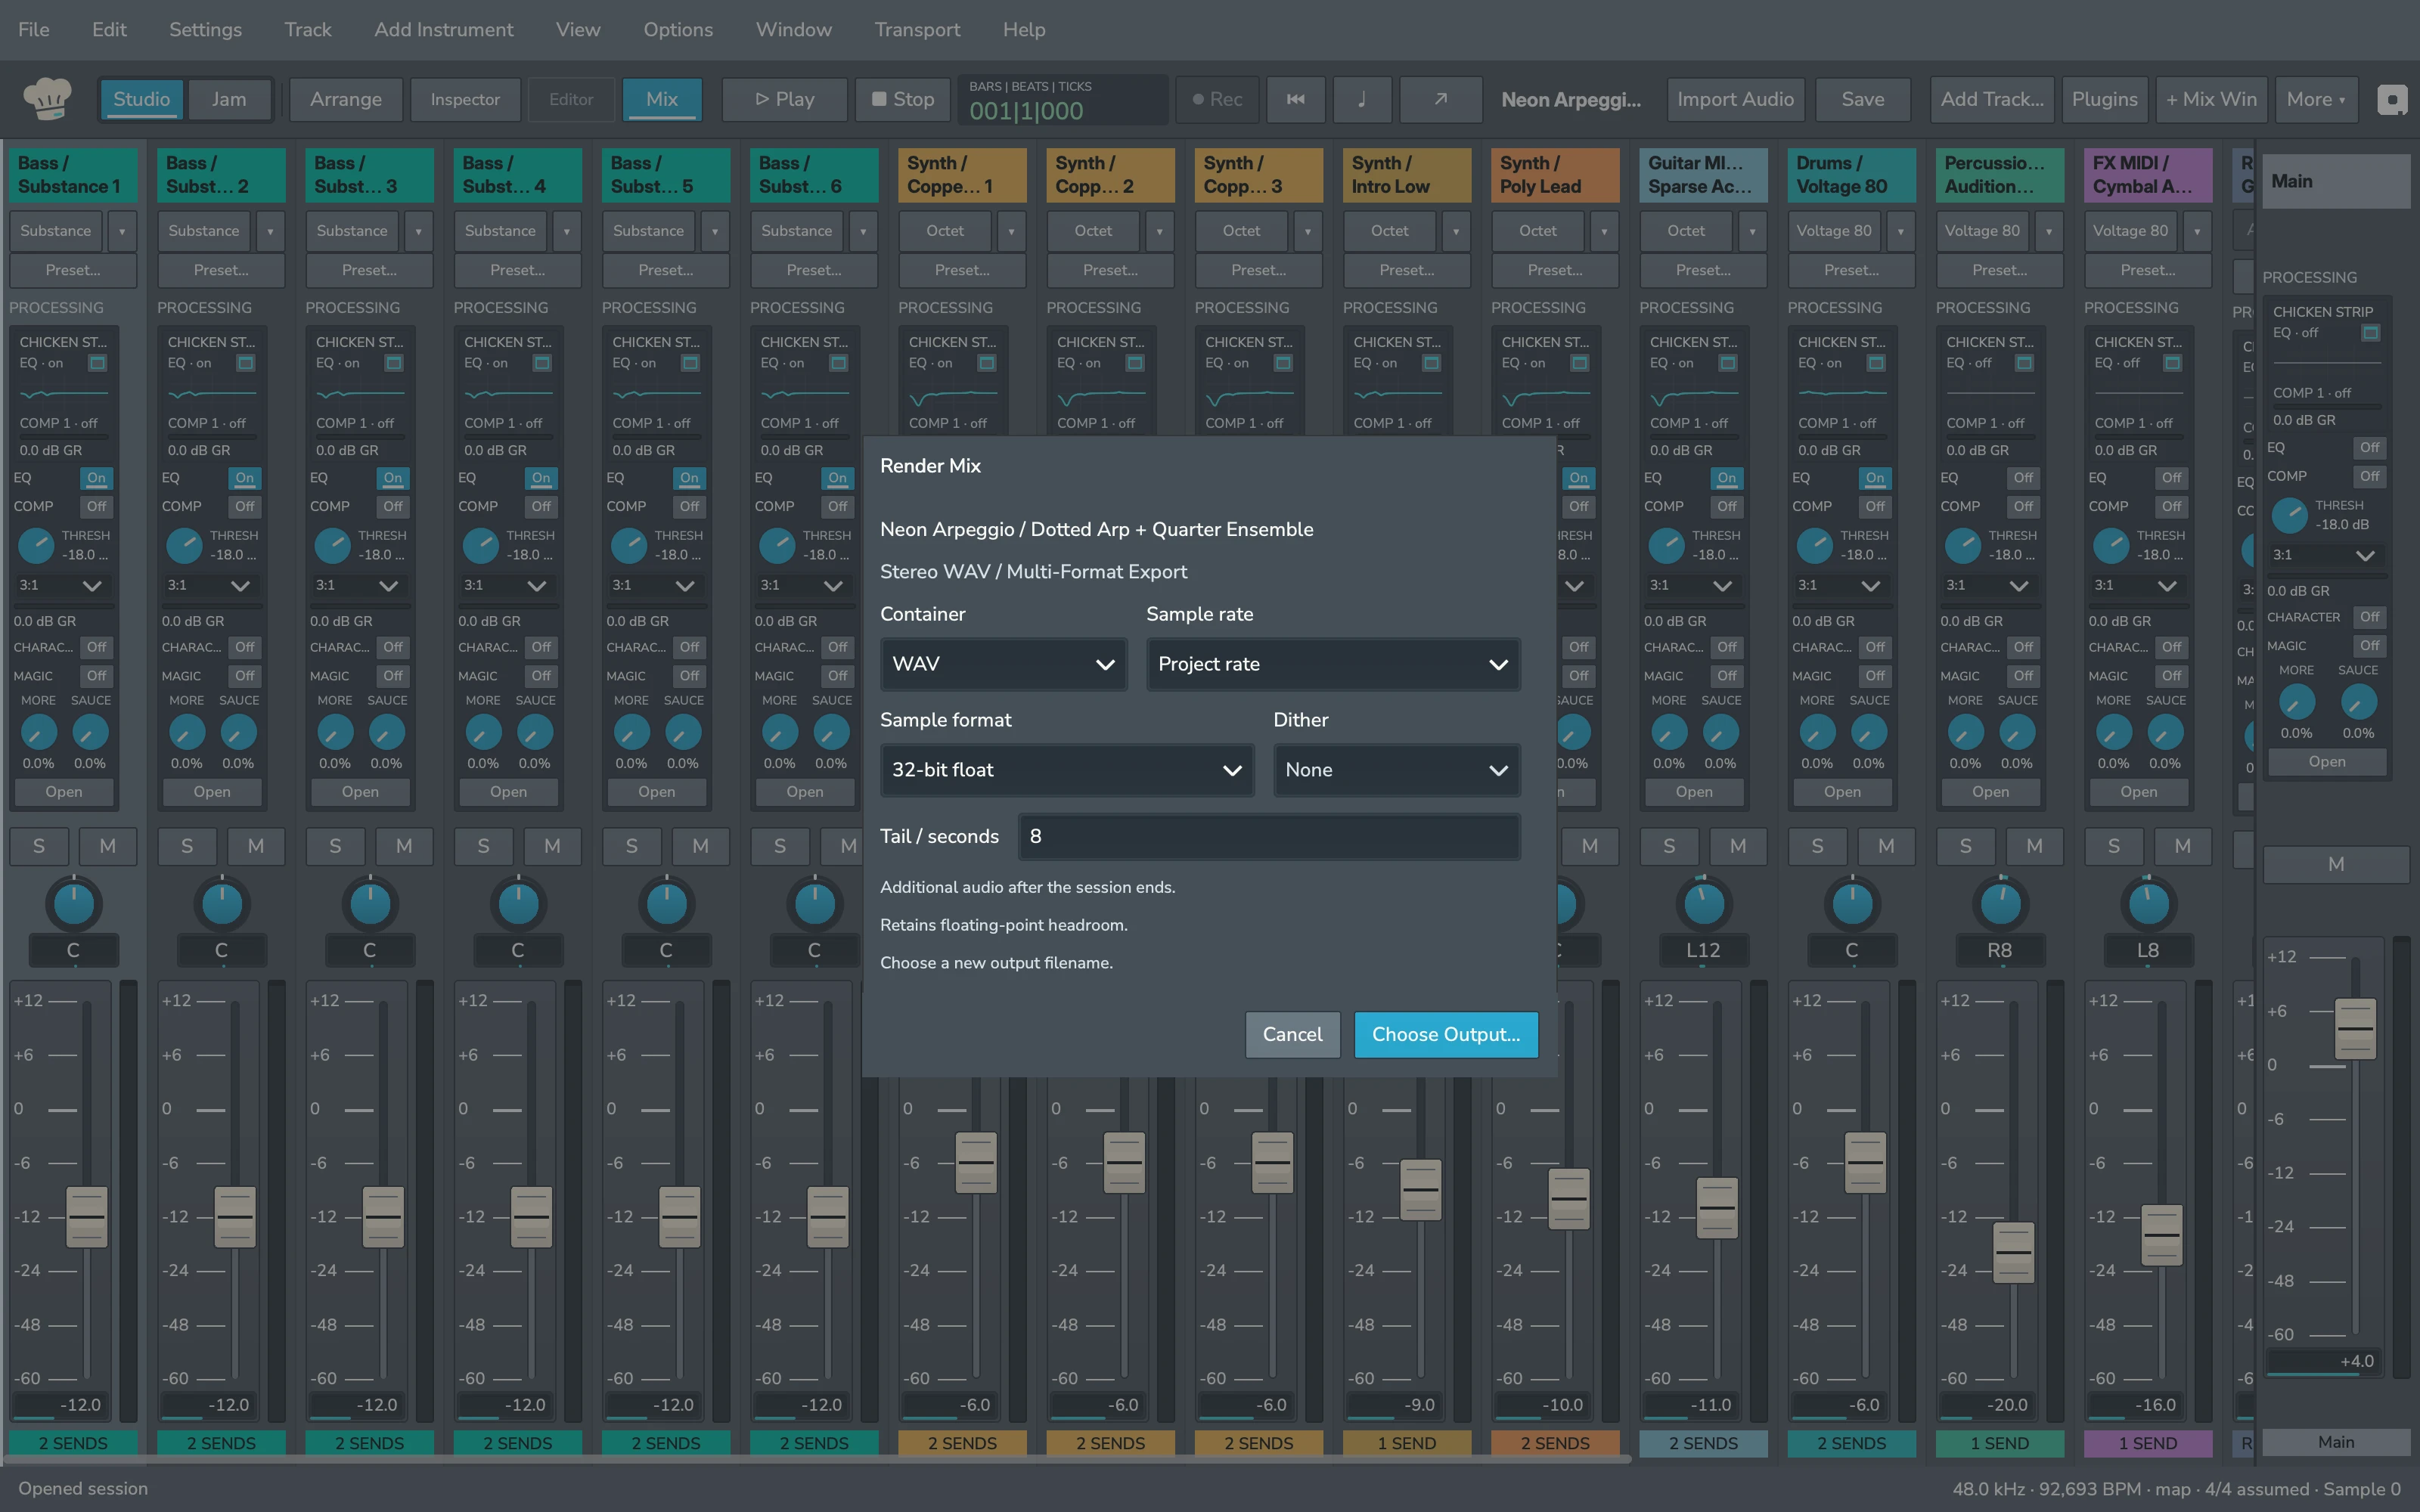
Render Mix is available when the session has at least one track and Head Chef is not recording.
What the render includes #
Render Mix records the session's main output in stereo, exactly as the mix is when you start the render:
- every track and instrument, with its channel processing and plugins;
- sends and Effect Returns;
- the processing and level on the main channel;
- mute and solo settings as they are when you start.
The render runs from the start of the session to its end, followed by the tail.
Choose a file format #
The File type list sets the kind of file Render Mix writes.
| File type | File |
|---|---|
| WAV | .wav |
| Broadcast Wave (BWF) | .bwf |
| AIFF | .aiff or .aif |
| FLAC (Lossless) | .flac |
| M4A / AAC | .m4a or .aac |
| Core Audio (CAF) | .caf |
| Standard MIDI (.mid) | .mid or .midi |
For a file you deliver, master or upload, choose WAV, AIFF or FLAC (Lossless): they keep every sample of your mix. M4A / AAC makes a smaller file for previews.
Standard MIDI (.mid) writes a format 1 MIDI file containing the tempo, time signature and a named track for each instrument track, including its note timing, MIDI channels and velocities. It renders no audio, effects or instrument sounds. This export currently omits controller, pressure and program events. Audio sample rate, sample format, dither and tail controls are hidden in this mode. They retain your choices when you switch back to an audio file type.
Choose Standard MIDI (.mid), click Choose Output…, and save to a new filename in an existing folder. Export does not move the playhead or change your song, selection or Undo history. An existing file is preserved; choose another name to export again.
A connected assistant or script can perform the same operation with midi.export after reading the current session. The result identifies the complete output file and its track/note counts. A warning about cleanup or syncing means the complete MIDI file was saved, but that follow-up step needs attention.
Export individual MIDI tracks #
To hand off separate MIDI parts, write one file for each chosen track:
- Right-click a track header and choose Export MIDI Tracks…. That track is already checked when it has a MIDI part. You can also choose File > Render Mix…, then MIDI tracks… under Source.
- Check the tracks you want, or use Select All and Clear. Audio-only tracks are not listed. The name below each track is the filename Head Chef will use.
- Click Choose Folder…, or enter an existing folder in Output folder.
- Click Export MIDI. The status line confirms how many tracks were exported.
Each file contains the song's tempo and time signature plus only that track's stored notes, including their channels, velocities and durations. Files keep their positions from the song start and preserve empty bars through the end of its musical range. A long part whose last note is early keeps its trailing rests. Instrument sounds, effects and audio are not rendered; mute, solo and track visibility do not filter the notes.
The previewed names include track order and track name. Characters that cannot be used in filenames are replaced. Every destination is checked before writing: if a filename already exists, choose a different folder. Existing files are never replaced.
Cancel closes the window without creating files. Once you click Export MIDI, wait for the result. If only some files could be saved, the status line gives the count; check the output folder before trying again. Changing the selected track while this window is open does not change the captured export. If an export is refused, the window shows the reason and stops another attempt until you click Refresh Tracks. Refresh loads the current song and clears the checkboxes, keeping your output folder; check the tracks again before exporting.
Export leaves the song, playhead and Undo history unchanged. It writes the notes currently stored in Head Chef; sustain and other controller messages, pitch bend, pressure, program changes, SysEx and release velocities are not included. It does not recreate event types that were not retained when importing the original MIDI file.
Connected assistants and scripts use midi.exportSources to read eligible tracks and their filenames, then midi.exportTracks with the captured session token, explicit track IDs and output folder. The result lists the complete files, their hashes and any warning, and identifies a failure after partial completion.
Export individual tracks as audio #
- Right-click a track header and choose Export Tracks as Audio…. You can also choose File > Render Mix…, then Audio tracks… under Source.
- Check the audio and instrument tracks you want, or use Select All and Clear. Each name is followed by its output filename. A track opened from its header is already checked when it contains audio or notes.
- Click Browse…, or enter an existing Output folder. Choose the Track output, Channels, sample rate, sample format, dither and tail.
- Click Export Audio. The progress window shows the job and each file's result. Tracks exported means the files are complete.
Changing the selected track in the main window does not retarget this export. If the song changes or an export is refused, read the reason in the export window. Refresh Tracks keeps the folder and settings, clears the choices and loads the current song; check the tracks again before retrying.
Choose the sound to include with Track output:
- Edited dry includes placement, trimming, clip gain, fades, clip mute and instrument sound, before track effects, volume and pan. Track mute, solo and VCA levels do not change this tap.
- Processed track includes track effects, volume automation, effective fader/VCA level and mute, and pan. Read follows the saved volume curve plus its governing VCA levels; Suspend uses the stored fader plus those VCA levels while keeping the curve for later. The file stops before shared returns and Bus/Main processing. Solo does not exclude a track you explicitly checked for export.
Native keeps mono or stereo for edited dry; processed tracks are stereo after pan. Mono combines left and right equally. Stereo duplicates a mono dry source. Choose WAV sample rate, sample format, dither and tail as needed. 32-bit float uses no dither and retains headroom above 0 dBFS. With a PCM format, an out-of-range sample stops the export before files are published; lower the track level or choose 32-bit float. Noise-shaped dither is available at 44.1, 48, 88.2, 96, 176.4 and 192 kHz.
Every file starts at the beginning of the song and keeps the same full song length and declared tail, including silence around shorter tracks. Place the files together at zero in another session to retain their alignment. Very large files automatically use RF64 when ordinary WAV sizes cannot hold the audio. Actual disk, filesystem and format limits can still stop a file from being saved.
Export leaves your song, live mix, selection, transport and Undo unchanged. It uses the sound captured when you clicked Export Audio; later edits are not included. One audio render runs at a time. Cancel during preparation, rendering or writing to discard pending files. Once publication starts, wait for the result.
Every destination is checked before writing, and existing files are never replaced. If a later file fails to publish, earlier files may already have been saved. The final progress view lists Saved, Saved with warning or Not saved for each filename. Read those results before retrying in a new folder.
Connected assistants and scripts use audio.exportSources to read eligible tracks, stable IDs, filenames and the captured session token. audio.exportTracks starts the same operation with that token, explicit track IDs and all export settings. Poll mix.renderStatus with the returned job ID; it returns the job directly. mix.cancelRender requests cancellation before publication and returns a session snapshot with the job under renderJob. Continue polling until the job finishes. Frame counters use the captured session rate, sourceRate; sampleRate is the output rate, and trackExport.outputFrames gives each converted file's frame count. File results include metadata and hashes.
Choose the sample rate #
Sample rate sets the rate of the finished file. Project rate keeps the session's own rate. Choose 44.1 kHz, 48.0 kHz, 88.2 kHz, 96.0 kHz, 176.4 kHz or 192.0 kHz to convert the finished mix to that rate before it is written.
Choose the sample format #
Sample format sets the bit depth of the file:
- 32-bit float is the default. It keeps floating-point headroom, so peaks above 0 dBFS are kept rather than clipped, and it needs no dither.
- 16-bit PCM, 24-bit PCM and 32-bit PCM write fixed-point audio. Choose 16-bit for CD-style delivery and 24-bit when someone asks for a fixed-point file with more detail.
Choose dither #
Dither adds a very quiet noise that masks the small errors made when audio is reduced to a fixed number of bits. The Dither list is available for the PCM formats:
- TPDF is the default. It adds a quiet, even noise floor.
- None writes the audio without dither.
- Noise shaped moves more of the dither noise toward high frequencies, where it is harder to hear, and raises the total noise level. It is offered for WAV files at 44.1, 48, 88.2, 96, 176.4 and 192 kHz.
With 32-bit float, Dither is set to None and cannot be changed.
Set the tail #
Tail / seconds adds audio after the session ends, so reverb and echo can fade out instead of stopping abruptly. The default is 8 seconds; you can enter any value from 0 to 120.
Keep working while it renders #
Head Chef renders in the background. The progress window does not block the app, so you can keep playing and editing.
- The render uses the mix as it was when you started. If you change the session afterwards, the window says Changes after rendering started are not included.
- Click Close to hide the progress window. While the render runs, the footer shows Rendering…; afterwards it shows Render Result. Click either to open the progress window again. Choosing File > Render Mix… during a render also opens it.
- Click Cancel Render to stop. The window then shows Render cancelled and no file is saved.
The status line moves through Preparing mix…, Rendering mix…, Writing audio… and Finishing… to Mix rendered. The line below it shows the sample rate, Stereo, the sample format and the dither.
One render runs at a time. To open another session, wait for the render to finish or cancel it first.
Read loudness and peaks #
When a WAV render finishes, the progress window lists Rendered audio, measured from the completed file including its tail:
| Readout | What it tells you |
|---|---|
| Integrated loudness | The average loudness of the whole file, in LUFS. |
| Loudness range | How much the loudness varies through the song, in LU. |
| True peak estimate (4×) | The highest true peak level, in dBTP, including peaks between samples. |
| Sample peak | The highest sample value in the file, in dBFS. |
Some readouts need enough audio. Integrated loudness needs at least 0.4 seconds and loudness range at least 3 seconds; shorter files show Less than 0.4 s or Less than 3 s. Very quiet audio shows Below loudness gate. For audio under 60 seconds, Head Chef notes that Loudness range is provisional for audio under 60 seconds.
If a render does not start #
- Finish or cancel the current gesture before rendering the mix. Let go of the fader, knob or clip you are dragging, then try again.
- A mix render is already running. Wait for it, or cancel it first.
- If the progress window shows Render failed, read the message below the status line. For a fixed-point format, a peak above 0 dBFS is the most common cause.