

Head Chef 1 User Guide · Chapter 2
Interface overview
This chapter is a map of the Head Chef window. After reading it you can name every area of the screen, say what each one is for, and jump to the chapter that explains it in detail. It also explains the three ideas that tie the areas together: the selected track drives what you see, Arrange and Mix are two views of one session, and Studio and Jam are two separate places to work.
For how to rearrange the window itself, such as track heights, the More menu and separate windows, see The workspace.
The Arrange view #
Arrange is where you build a song along a timeline. The picture shows a session with instrument and audio tracks, with the first track selected.
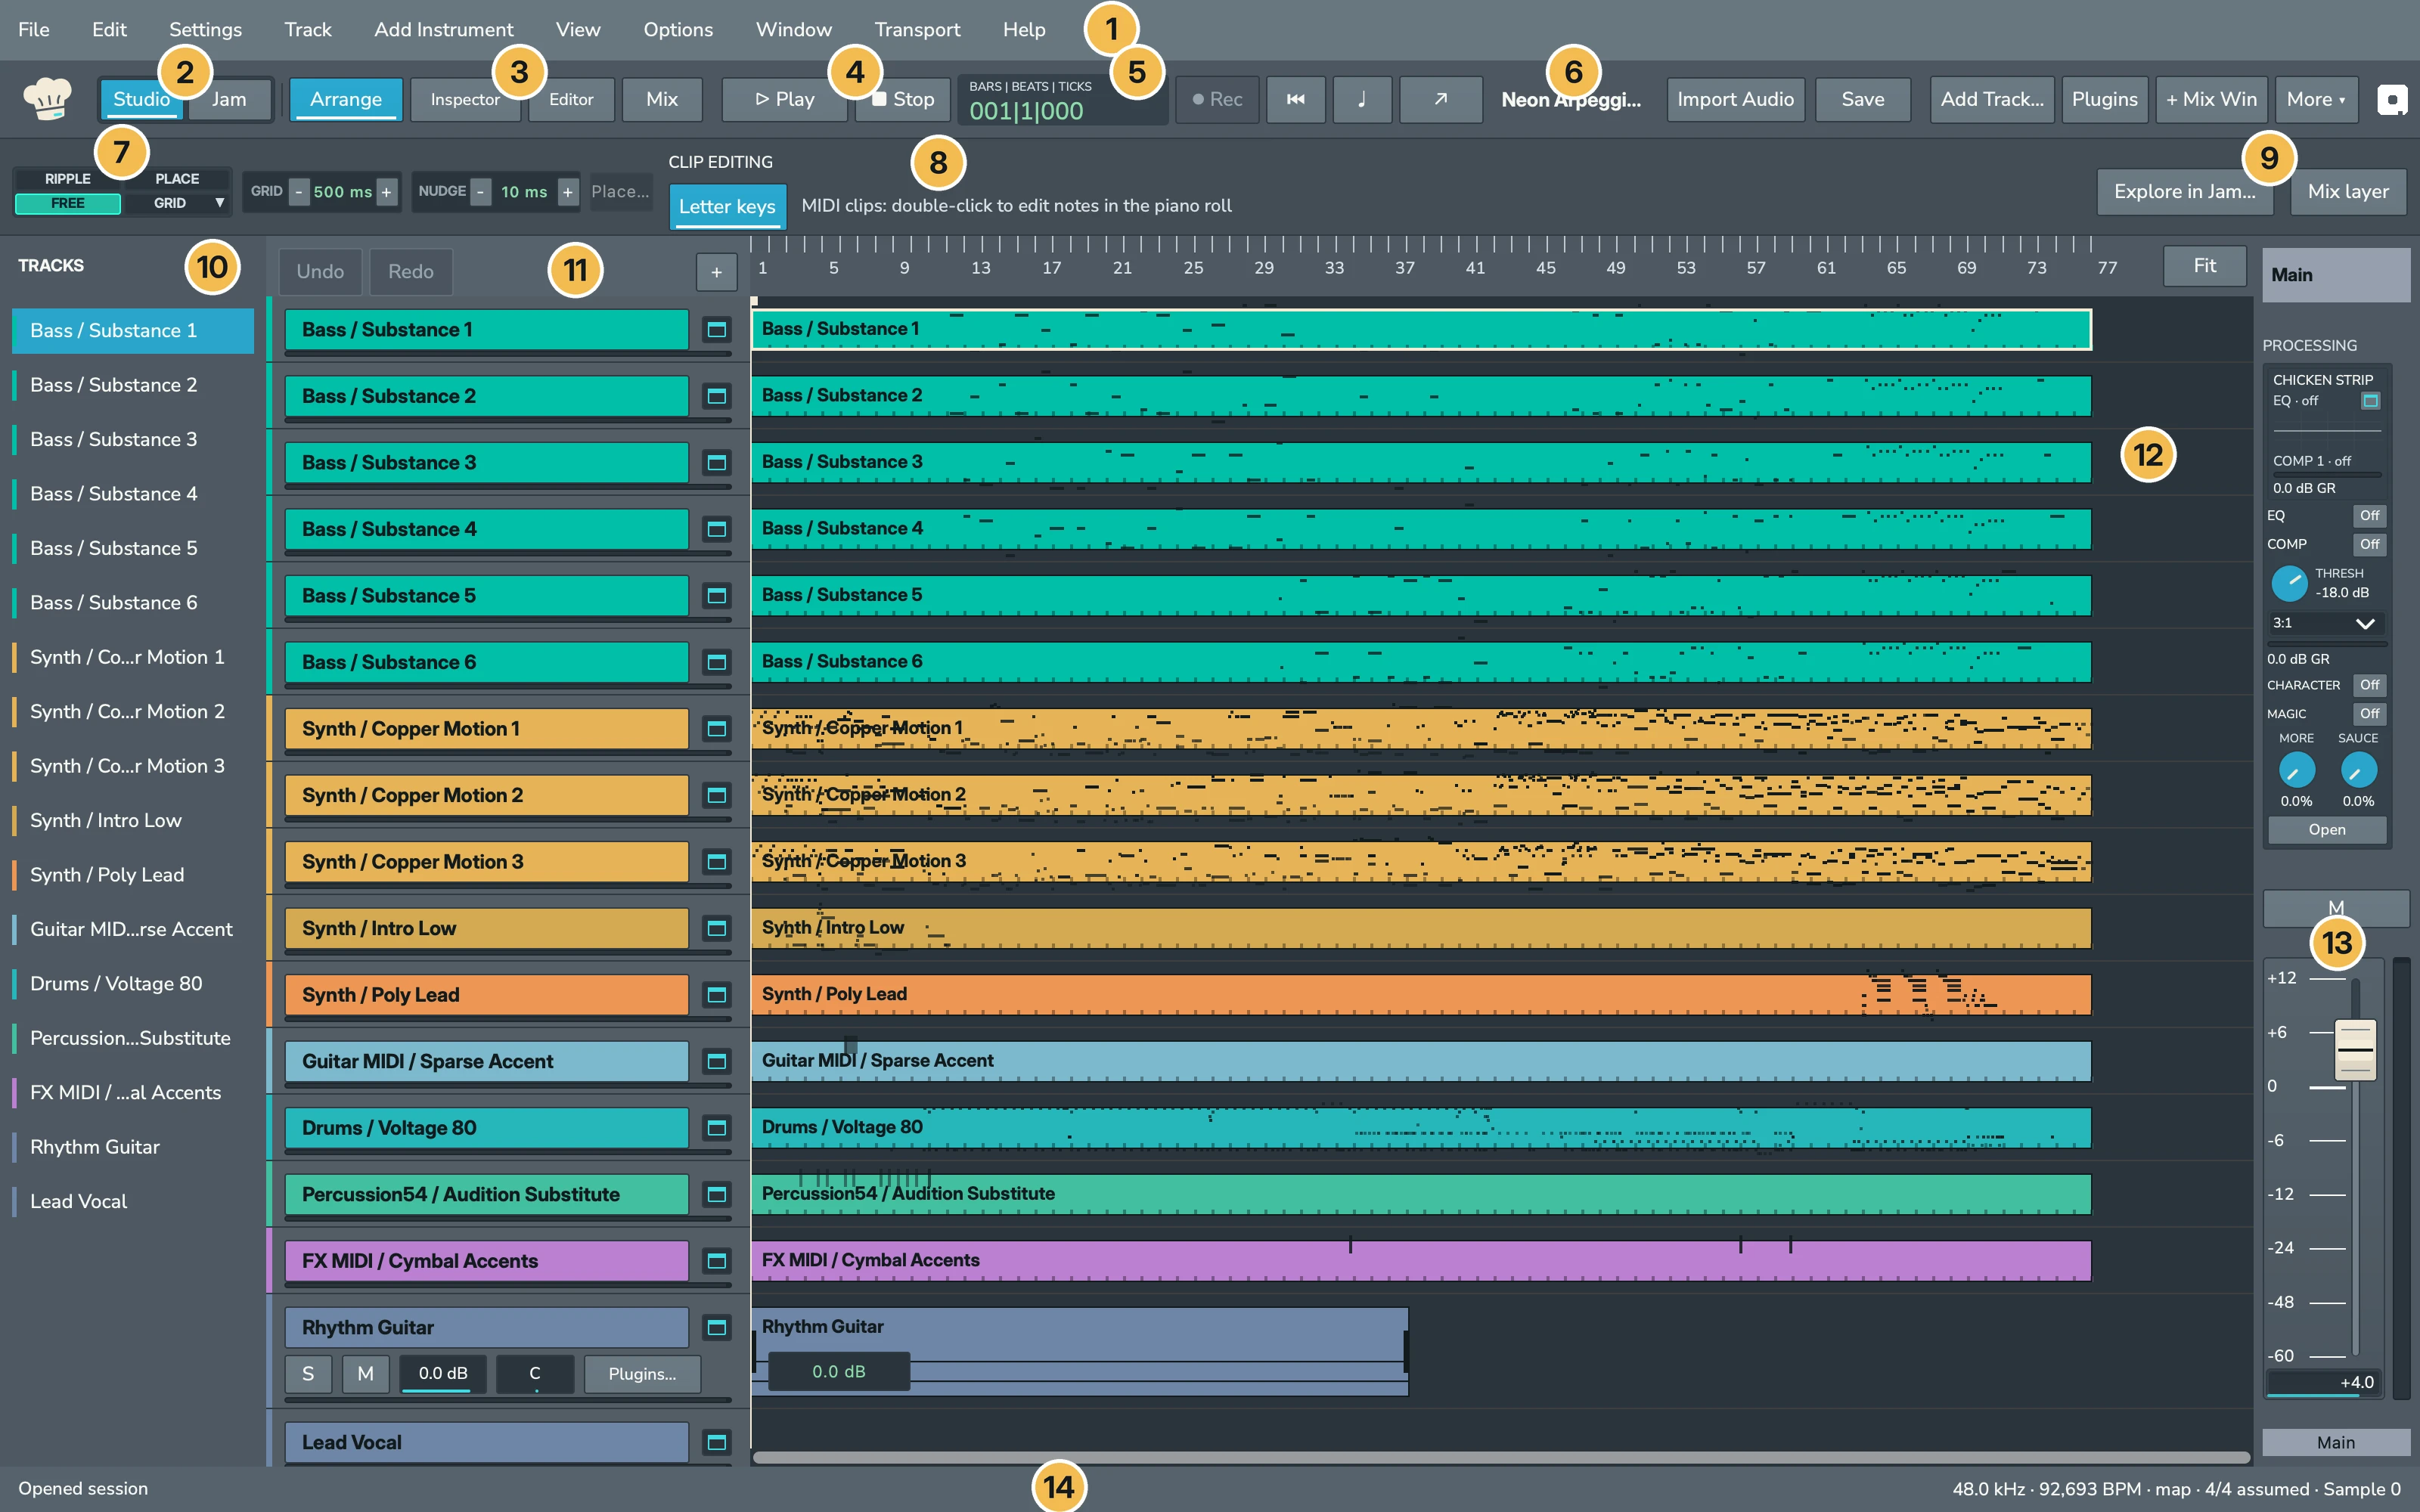
| # | Area | What it does | Learn more |
|---|---|---|---|
| 1 | Menu bar | Every command, grouped in the File, Edit, Settings, Track, Add Instrument, View, Options, Window, Transport and Help menus. | Menu reference |
| 2 | Studio and Jam | Studio identifies the session window. Jam ↗ opens the separate Jam window for ideas. | Jam |
| 3 | View buttons | Arrange and Mix switch the view. Inspector shows the selected channel's controls and Editor shows the selected clip. Narrow windows show ◧ and ▤ instead. | The workspace |
| 4 | Transport | ▷ Play and ■ Stop. After the clock come ⏺ Rec, ⏮ (Go to Start), ♩ (metronome) and ↗ (Floating Transport). Wider windows add rewind and forward. | Transport and navigation |
| 5 | Clock | Shows where the cursor is. The small heading names the format, here bars, beats and ticks. Click to change the format. | Transport and navigation |
| 6 | Session name and toolbar actions | The session name, followed by a dot while changes are unsaved. Then Import Audio, Save, Add Track…, Plugins, + Mix Win and More ▾, which holds the buttons that do not fit. | Sessions, The workspace |
| 7 | Edit modes, grid and nudge | RIPPLE, FREE, PLACE and GRID decide how clips move when you drag them. GRID and NUDGE set the step sizes with their minus and plus buttons. | Editing audio |
| 8 | Clip editing | Letter keys turns the Arrange letter shortcuts on or off. Beside it, a hint explains how to edit clips on the selected track. | Keyboard shortcuts |
| 9 | Explore in Jam and Mix layer | Explore in Jam… opens the transfer review, whose limits are explained in Jam. Mix layer shows mixing controls on the tracks in Arrange. | Jam, Mixing |
| 10 | Tracks list | TRACKS lists every track by name. Click a name to select that track. | The workspace |
| 11 | Track headers | Each track's name in its color. Taller headers add S, M, level, pan and Plugins…. Above them sit Undo, Redo and +, which adds a mono audio track. | Tracks |
| 12 | Ruler and timeline | The ruler counts bars and beats, or time. Below it, each track's clips sit in a row. Fit at the end of the ruler shows the whole session. | Transport and navigation, Editing audio |
| 13 | Main channel | The Main strip for the whole mix: its processing, M, fader and meter. | Mixing |
| 14 | Status bar | On the left, the last thing that happened, here Opened session, plus progress and messages. On the right, the sample rate, tempo, time signature and cursor position in samples. | The workspace |
The Mix view #
Mix shows the same tracks as a row of channel strips, like a mixing desk. Click Mix in the toolbar, choose View > Mix, or press ⌘= to switch between Arrange and Mix.
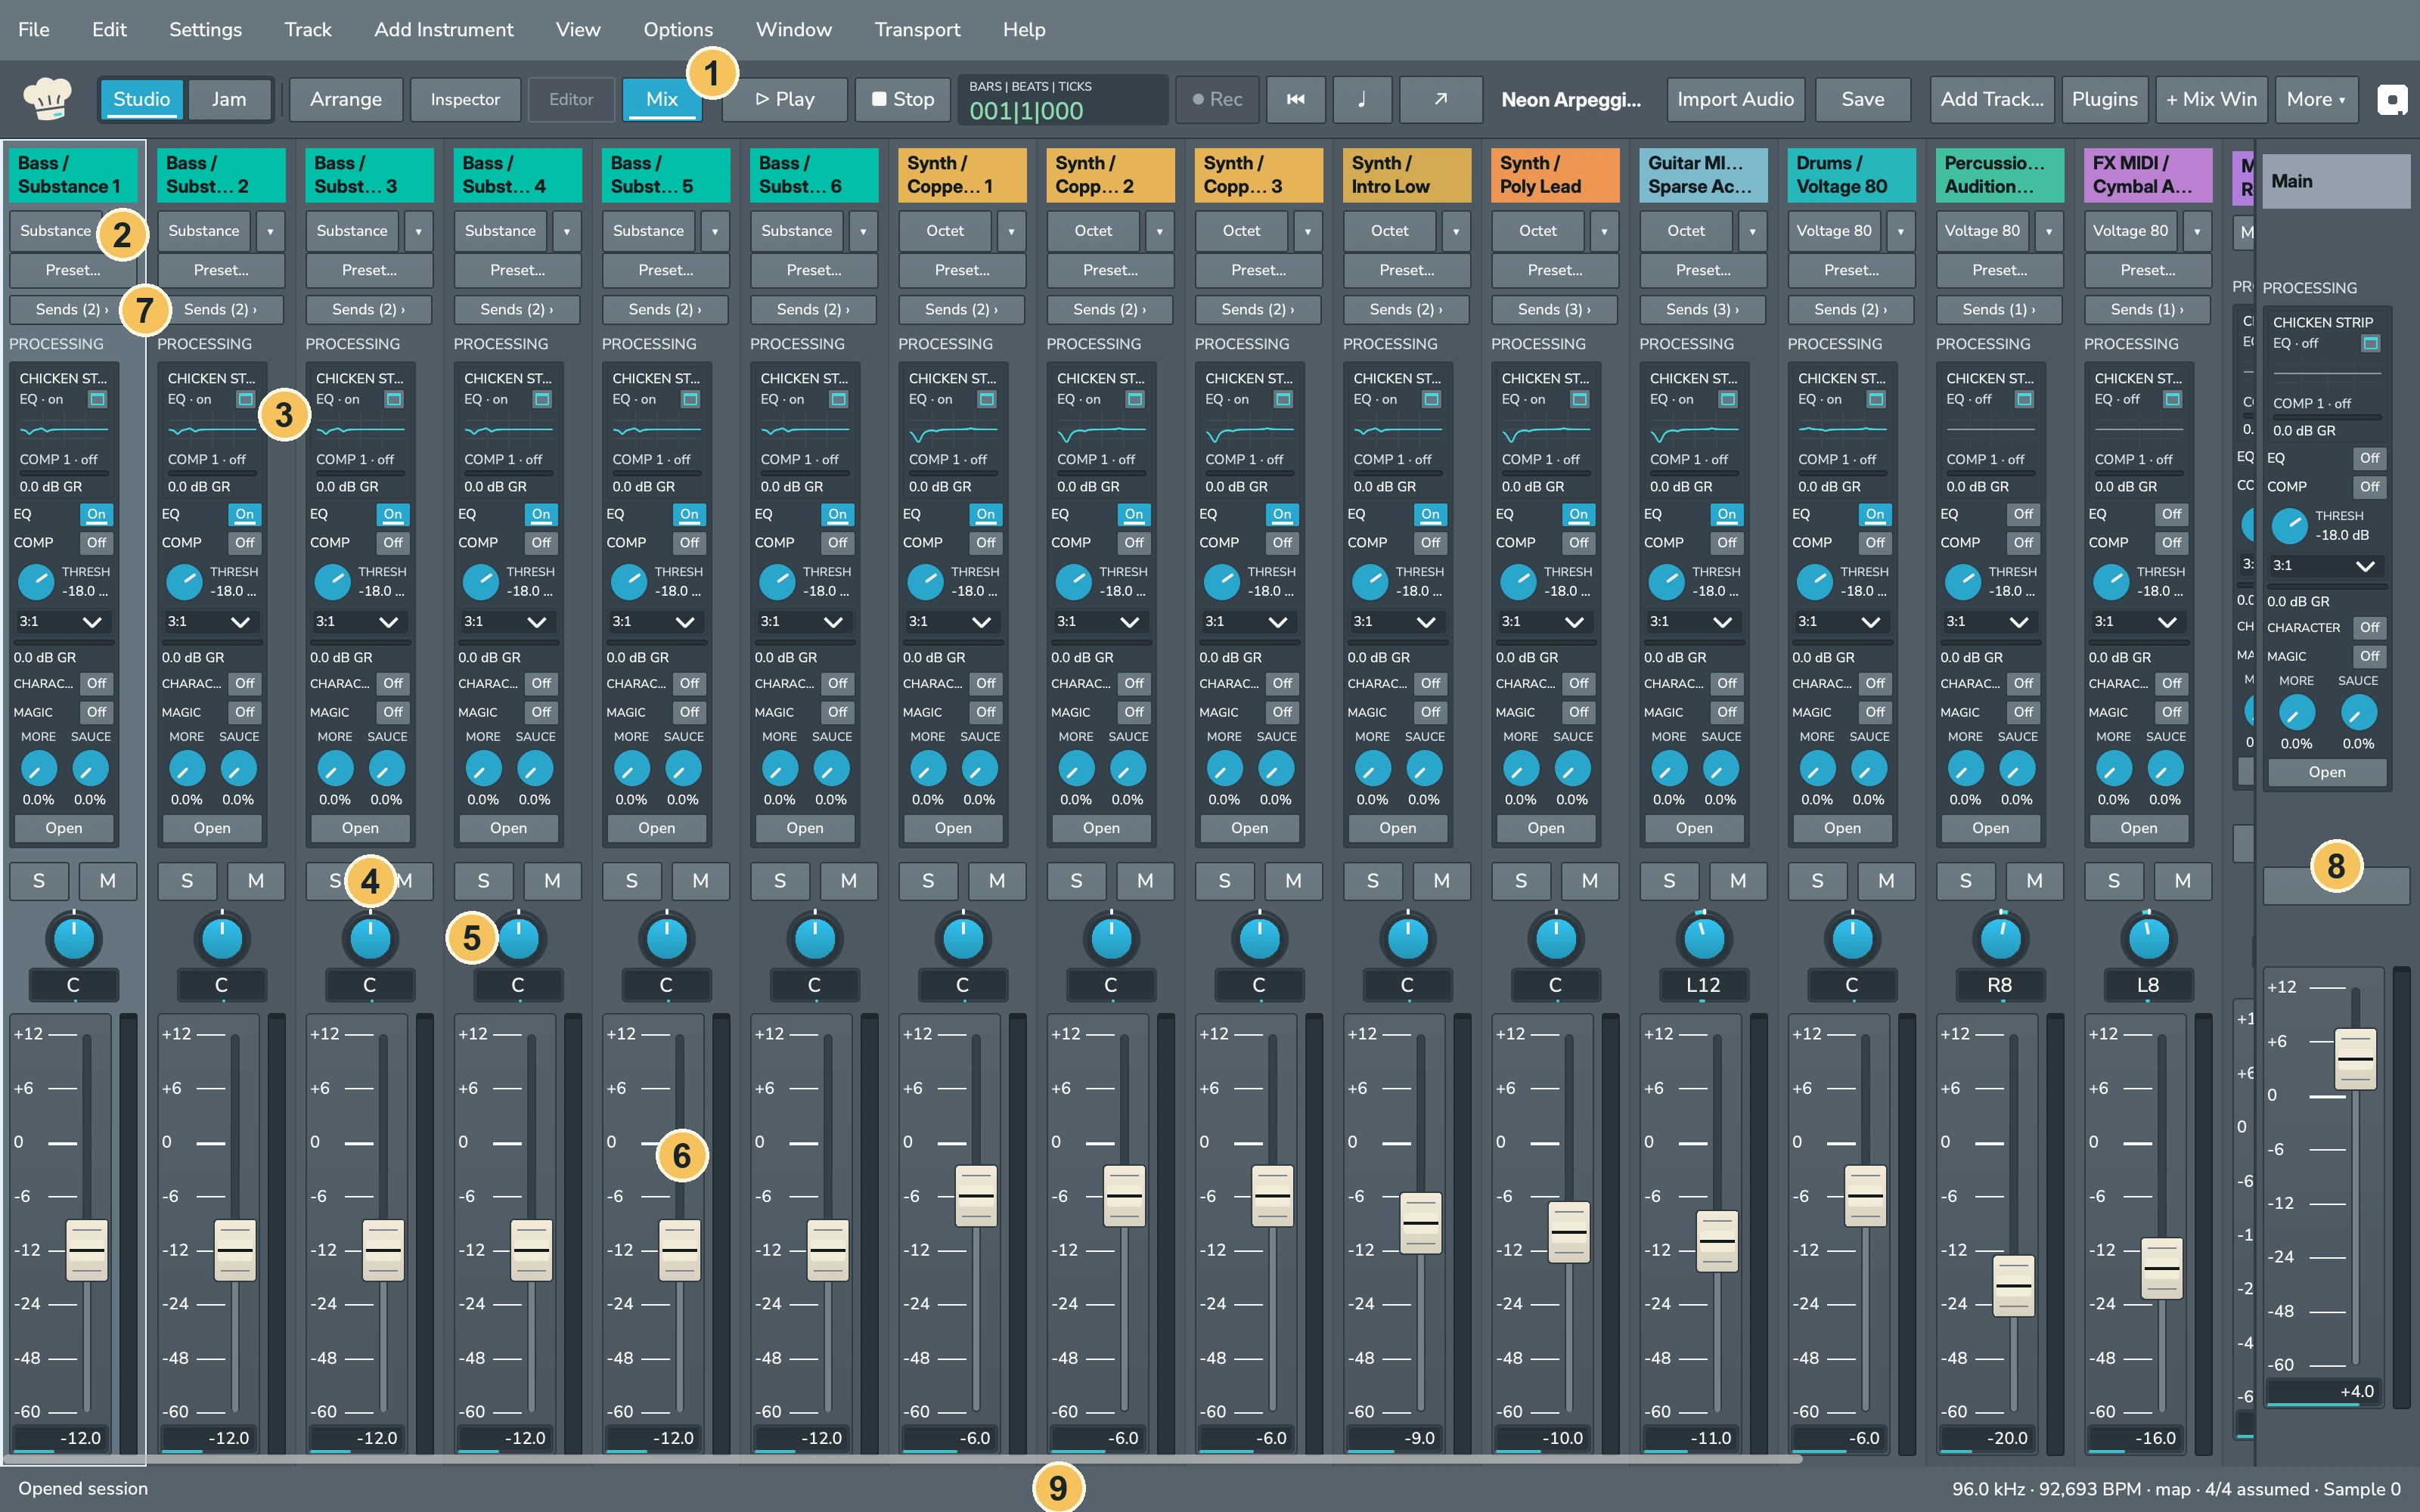
| # | Area | What it does | Learn more |
|---|---|---|---|
| 1 | View buttons | Mix is lit while the Mix view is showing. Editor is dimmed because it belongs to Arrange. | The workspace |
| 2 | Strip top | The channel name in the track's color, Preset… for channel presets, and the instrument or input. On an instrument track, the ▾ button changes the instrument. | Mixing |
| 3 | Processing | PROCESSING shows Chicken Strip at a glance and the channel's effects. Open shows the full controls. | Mixing |
| 4 | Solo and Mute | S solos the channel and M mutes it. | Mixing |
| 5 | Pan | The pan knob, with its position below it: C for center, or a side and amount such as L12 or R8. | Mixing |
| 6 | Fader and meter | The fader sets the channel level, shown in dB below it. The meter beside it shows the signal. | Mixing |
| 7 | Sends | Sends sits above the processing controls and shows the count in parentheses, for example Sends (2). Click it to edit that channel's sends. | Mixing |
| 8 | Main channel | Main stays pinned at the right edge however far you scroll. | Mixing |
| 9 | Status bar | The same status bar as in Arrange. | The workspace |
A light outline marks the selected channel, here the first strip. When there are more strips than fit, scroll sideways along the row.
How the areas work together #
The selected track drives the screen #
Head Chef has one selected track at a time. Click a name in the TRACKS list, a track header, a clip or the name at the top of a Mix strip to select it. Many areas then follow that selection:
- The Inspector shows the selected channel's sound, processing and sends.
- Editor shows the selected clip along the bottom of Arrange.
- The clip editing hint in area 8 changes to match the selected track, for example MIDI clips: double-click to edit notes in the piano roll.
- Track keys act on the selected track: ⇧S solos it, ⇧M mutes it, ⇧R arms it for recording, and ⌘↑ and ⌘↓ make it taller or shorter.
- A connected MIDI keyboard plays the selected instrument track. See Connect your hardware.
The selection is shared by every view and window, so selecting a strip in the Mix Window selects the same track in Arrange.
Arrange and Mix are two views of one session #
Arrange and Mix are not separate documents. A fader you move in Mix moves in the Arrange mix layer, and a track you add in Arrange appears in Mix straight away. Undo works the same in both.
To see both at once, keep Arrange in the main window and open Mix in its own window:
- Choose Window > Mix Window, click + Mix Win in the toolbar, or press ⇧⌘=.
- Move the Mix Window to another part of the screen or another display.
To mix without leaving Arrange, click Mix layer in the edit toolbar. Each track then shows its mixing controls next to its clips. See Mixing.
Studio and Jam are two places to work #
Studio and Jam have separate windows and keep their musical material independently.
- Studio is your session: a song you arrange, edit, mix and render. It holds the Arrange and Mix views.
- Jam is a sketchpad in its own window. Click Jam ↗ to open it and save ideas in Your jams, separately from any session.
You can jam without creating a session or keeping the Studio window open. The Jam window has its own ▶ PLAY, Your jams, + New Jam, Save Jam and the Studio transfer button controls. Click Studio to bring Studio forward while leaving Jam open. Closing Studio leaves Jam available.
Material moves between the two only when you ask:
- the Studio transfer button in Jam prints a jam to tracks in your session.
- Explore in Jam… in Studio opens a review. It does not copy the selected notes or audio in Head Chef 1.0. Your session does not change.
See Jam for both.
When the window is smaller #
Head Chef fits the window to the space it has. In a narrower window:
- the Inspector and Editor buttons show symbols, and Import Audio becomes Import;
- buttons that do not fit move into More ▾, shown as ⋯ in very narrow windows;
- the TRACKS list is hidden; select tracks by their headers instead.
Widen the window, or use full screen, to bring them back. For the details, see The workspace.
Find your way back #
- Press ⌥⌘1 to show Arrange and put the keyboard on the timeline.
- Press ⌘= to switch between Arrange and Mix.
- Choose Help > Keyboard Shortcuts… to search every shortcut. See Keyboard shortcuts.
- Choose Help > Head Chef 1 User Guide to open this guide.