

Head Chef 1 User Guide · Chapter 6
Connect your hardware
This chapter helps you connect the hardware you play and listen through. You will choose an audio interface or your Mac's own sound, pick a buffer size that suits what you are doing, read the sample rate, clock and latency lines, set up inputs and microphone access, and connect one or more MIDI keyboards. A checklist at the end helps when Head Chef does not see a device.
Head Chef works with the audio and MIDI devices that macOS lists. Connect your hardware and install any driver its maker supplies first. You can connect a device while Head Chef is open.
The Audio Engine window #
Choose Settings > Audio Engine… or press ⌘,. The window lists the devices macOS reports each time it opens.
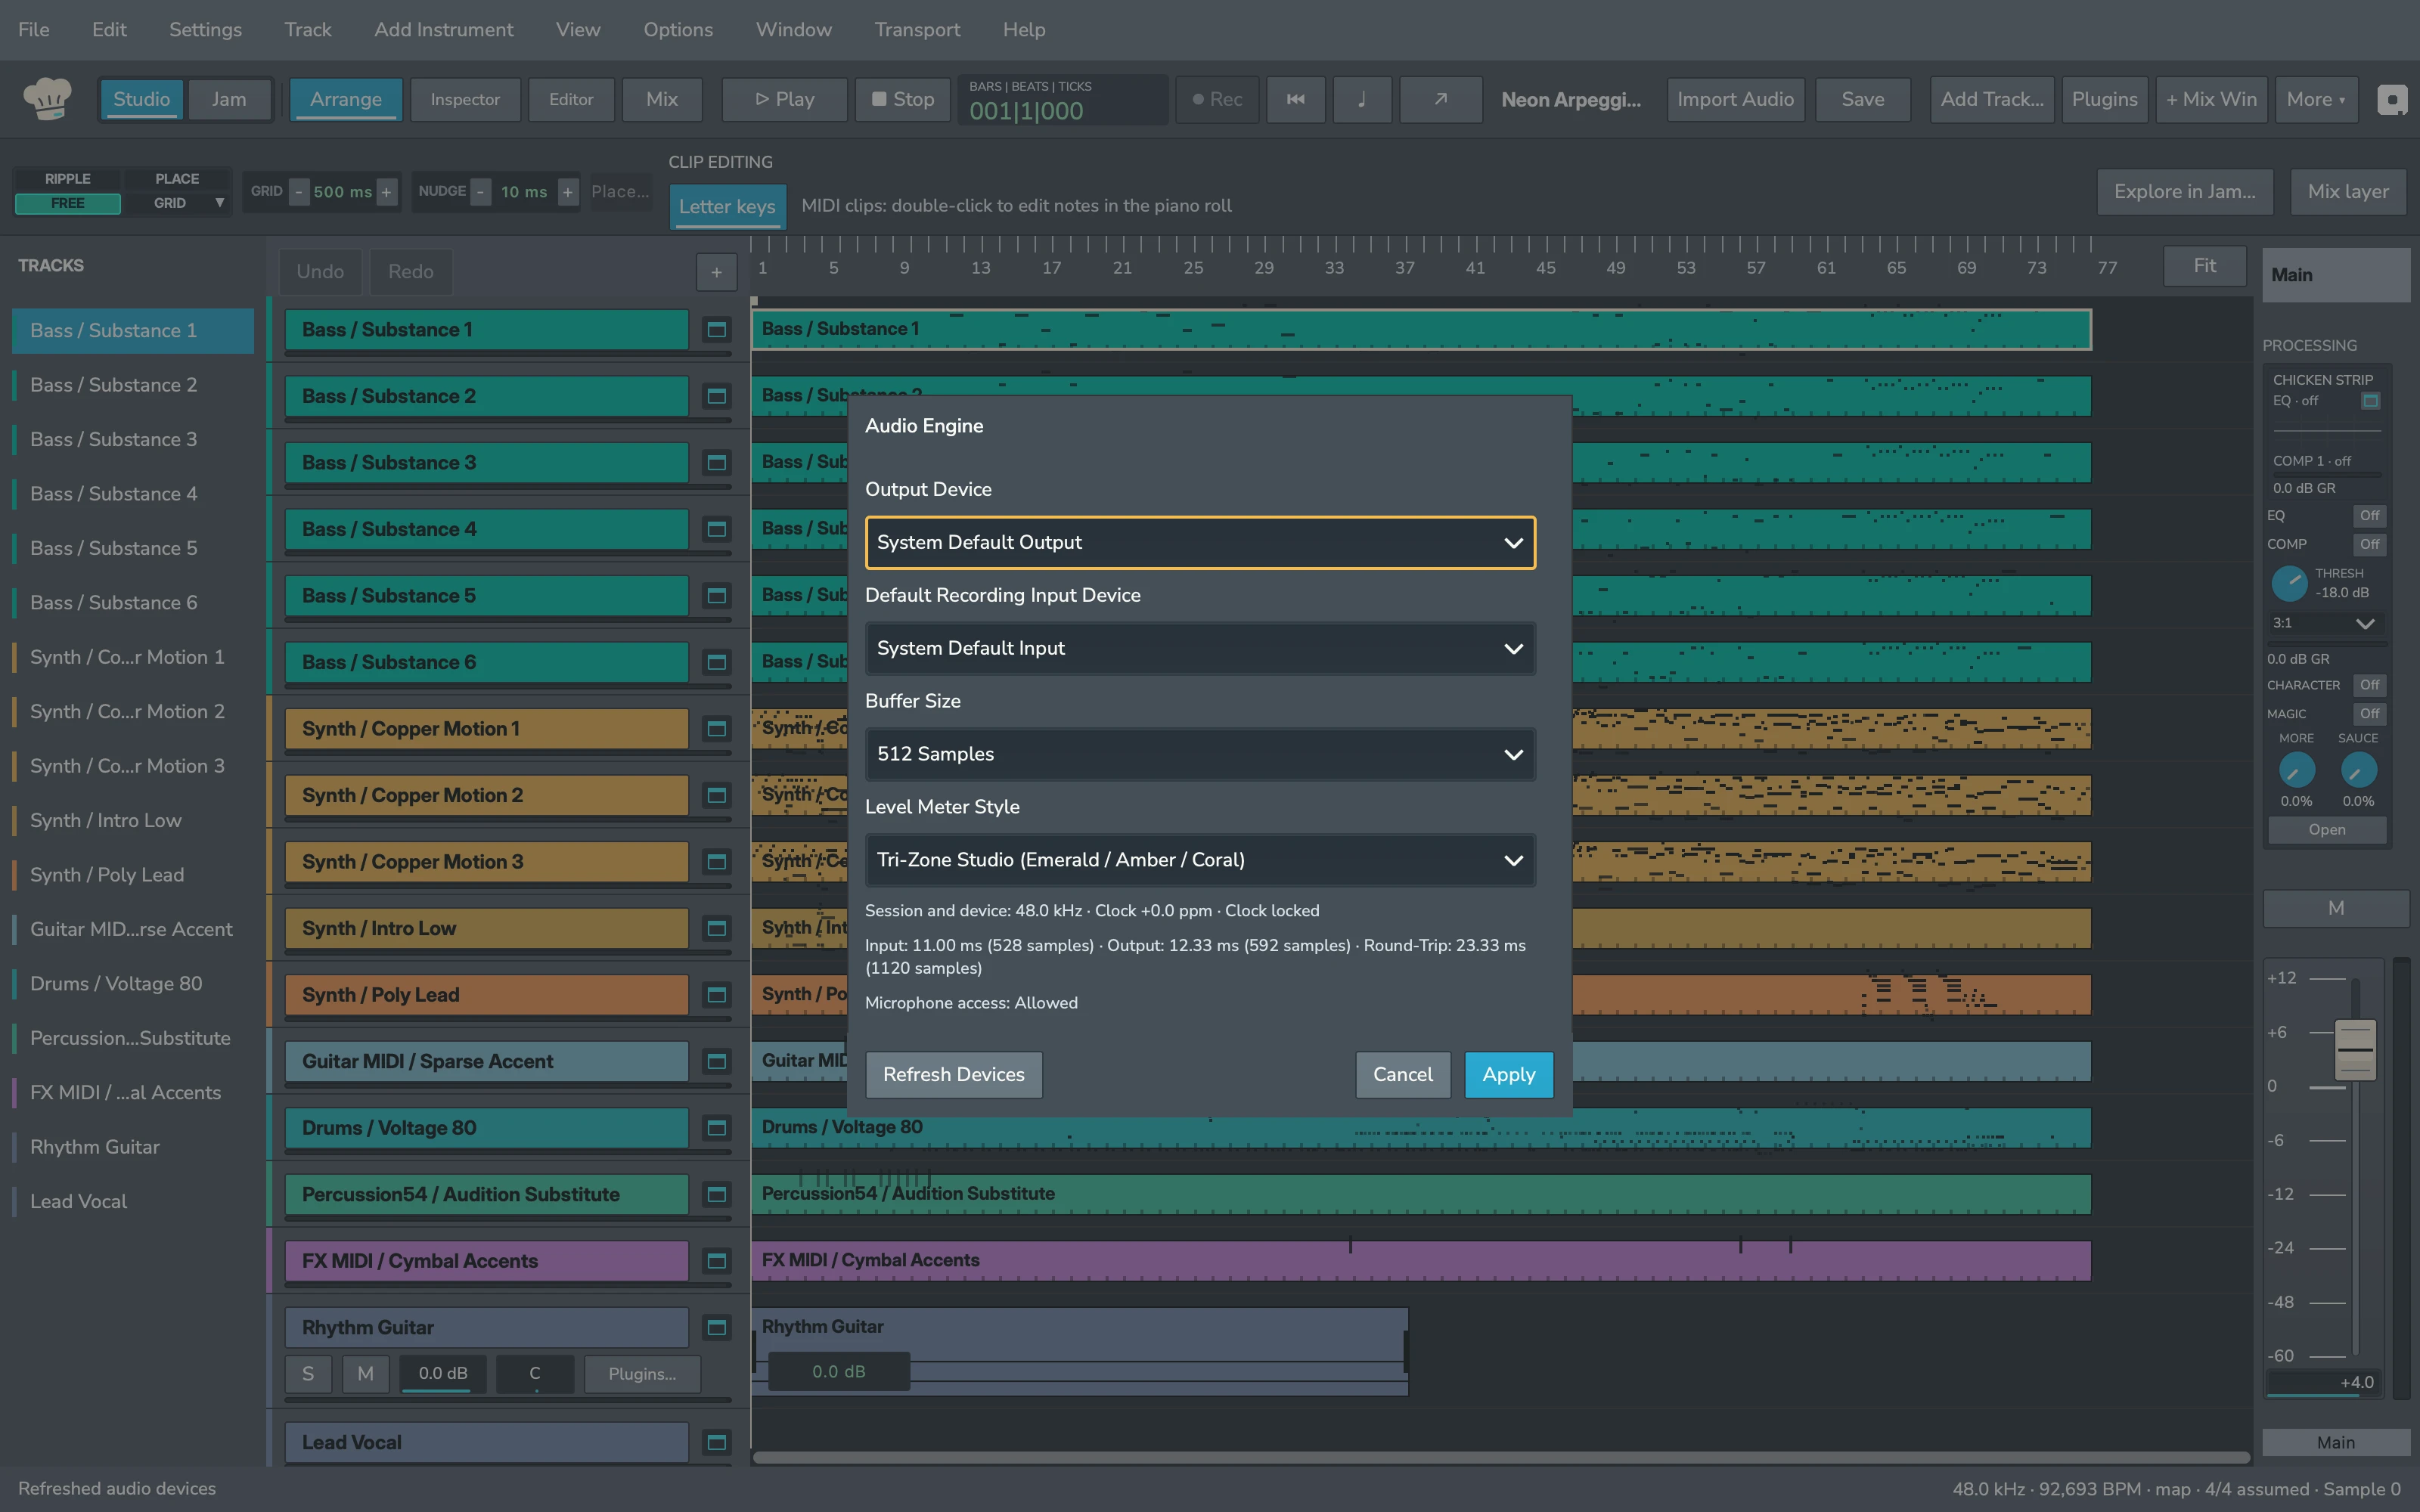
| Setting | What it does |
|---|---|
| Output Device | The device Head Chef plays through. System Default Output follows the output chosen in macOS. Each device shows its channel count, for example (2 ch). |
| Default Recording Input Device | The input device new mono audio tracks start on. System Default Input leaves new tracks without an input until you choose one. |
| Buffer Size | How many samples Head Chef processes at a time. The list shows the sizes the chosen output device supports, between 32 and 2048 samples. |
| Level Meter Style | The colors of every level meter: Tri-Zone Studio (Emerald / Amber / Coral) or Monochrome Cyan-Mint. |
Below the settings, three lines report the sample rate and clock, the latency, and Microphone access. Refresh Devices looks again for connected devices, Apply switches to the device and buffer you chose, and Cancel closes the window without changing them.
Level Meter Style changes the meters the moment you choose it, and Head Chef remembers it the next time it starts. Your device and buffer choices last until you quit. When Head Chef starts again, it uses System Default Output and System Default Input.
You cannot open or change the Audio Engine window while Head Chef is recording.
Choose a buffer size #
The buffer is the slice of audio your Mac fills at a time before passing it to the interface. A smaller buffer means less delay between playing and hearing, but your Mac must fill each slice faster.
| Buffer | One buffer at 48 kHz | Good for |
|---|---|---|
| 32 or 64 samples | under 1.5 ms | Playing instruments live with the least delay, on a light session. |
| 128 or 256 samples | about 2.7 to 5.3 ms | Recording and playing live in most sessions. |
| 512 samples | about 10.7 ms | General work: editing, arranging and light mixing. |
| 1024 or 2048 samples | about 21 to 43 ms | Mixing large sessions with many plugins. |
When you choose 32 or 64, the window warns: 32 and 64 sample buffers minimize monitoring latency but increase real-time CPU load. If you hear crackles or dropouts after you click Apply, choose the next larger size.
Read the latency line #
The latency line shows three figures, each in milliseconds and samples:
- Input: the delay from the interface's input to Head Chef;
- Output: the delay from Head Chef to the interface's output;
- Round-Trip: the two together, which is what you hear when you play through Head Chef. It is never less than two buffers.
The figures combine the buffer you choose with the delay the device itself reports. They change when you pick another buffer, before you click Apply, so you can compare sizes.
Read the sample rate and clock line #
When the session and the device run at the same sample rate, the line reads, for example:
Session and device: 48.0 kHz · Clock +0.0 ppm · Clock locked
- The ppm figure is the clock drift: how far the device's real speed differs from its stated rate, in parts per million. A figure close to zero is normal.
- Clock locked means the clock is steady. When the drift goes beyond 100 ppm, or the chosen output is unavailable, the line turns amber and reads Clock drift warning.
When the session and the device run at different rates, the line says so, for example Session is 44.1 kHz and the device is set to 48.0 kHz, and adds Play switches the device to the session rate when the device supports it.
If you see Clock drift warning, check the interface's cable and the clock source setting in its own control software.
Headphones and speakers #
Head Chef plays its stereo mix on the first two outputs of the Output Device.
- Connect your speakers to outputs 1 and 2 of the interface, or plug headphones into its headphone socket.
- In Output Device, choose the interface. To use your Mac's own speakers or headphone socket, choose them or System Default Output.
- Click Apply, then press Space to play.
Set the listening level on the interface or the Mac, and the mix level with the Main fader.
If a device you chose is disconnected, the list shows it as Unavailable Audio Output with its name. Reconnect it and click Refresh Devices, or choose another device.
Inputs and microphone access #
Head Chef records one mono input per track. macOS asks your permission before any app uses an audio input, including an interface, and Head Chef asks the first time you enable an input on a track. The Microphone access line in the Audio Engine window shows the current state:
| Shown | Meaning |
|---|---|
| Allowed | Head Chef can record. |
| Not requested yet. Head Chef asks the first time you enable an input. | Enable an input on an audio track to be asked. |
| Blocked. Allow Head Chef in System Settings > Privacy & Security > Microphone. | Turn Head Chef on in that macOS setting, then try again. |
| Restricted on this Mac by a device policy. | Ask the person who manages the Mac. |
| No input device is available. | Connect an interface or microphone, then click Refresh Devices. |
To choose inputs:
- In the Audio Engine window, choose Default Recording Input Device. Each new mono audio track then starts on that device's first input.
- To choose a different input for one track, click the input button on its header, which reads Choose input… until you pick one. See Recording audio.
If a device you chose is disconnected, it appears as Unavailable Audio Input with its name.
Head Chef does not play your input back while you record. To hear yourself, use your interface's direct monitoring. See Recording audio.
MIDI keyboards #
Head Chef connects MIDI keyboards automatically.
- Connect the keyboard to your Mac, by USB or through a MIDI interface. You can do this while Head Chef is running.
- Select an instrument track.
- Play.
Head Chef notices a keyboard as you connect or disconnect it, and connects up to 16 at once. Playing sounds the instrument live; to write notes into a clip, use the piano roll. See MIDI and instruments.
Which track plays #
Your keyboard plays the selected track when it is an instrument track. If the selected track is not an instrument track, the keyboard keeps playing the instrument track you played last, or the first instrument track in the session.
The MIDI button and its panel #
The MIDI button in the toolbar shows what the keyboard is doing:
| Button reads | Meaning |
|---|---|
| MIDI | Keyboard input is on and waiting. |
| MIDI · C4 | You are holding a key; the button names the note. Middle C is C4. |
| MIDI · Sust | The sustain pedal is down. |
| MIDI Off | Keyboard input is off. |
Click MIDI to open the MIDI KEYBOARD INPUT panel. In narrow windows, choose More ▾ > MIDI Keyboard….
| Control | What it does |
|---|---|
| ON / OFF | Turns keyboard input on or off. |
| Target line | Plays Selected Track with the track's name, or Select an instrument track to play live. |
| Activity line | The last note, with its velocity and MIDI channel, for example Last note: C4 (vel 100, Ch 1). |
| Keyboard Source | All Connected Keyboards (Auto), or one keyboard by name. |
| MIDI Channel | All Channels (Omni), or one midi channel from 1 to 16. |
| Refresh Ports | Looks again for connected keyboards. |
| All Notes Off | Silences any note that keeps sounding. |
Use more than one keyboard #
With All Connected Keyboards (Auto), every connected keyboard plays the selected track. To use only one, click its name under Keyboard Source. If that keyboard is disconnected, the panel shows Selected keyboard is offline: switch to All Connected Keyboards (Auto) or reconnect it.
To play only the notes sent on one channel, for example one half of a split keyboard, click that channel's number under MIDI Channel.
Sustain, pitch bend and other controls #
- The sustain pedal works with every built-in instrument. While it is down, the panel shows Sustain Pedal Down, or adds Sustain Down after the last note.
- Head Chef uses the notes, their velocity and the sustain pedal. Pitch bend, the modulation wheel and other knobs and sliders on the keyboard do not change the sound.
- A keyboard's own all-notes-off message releases its notes, the same as All Notes Off.
Control surfaces #
Head Chef works with a control surface set to Mackie Control mode. Choose Settings > Control Surface…, pick the surface under MIDI input and MIDI output, and click Enable. Its MIDI input is then reserved for the surface, so the MIDI keyboard panel lists it with (Control Surface) and you cannot choose it as a keyboard. For the full steps and what each control does, see Control surfaces and assistants.
If Head Chef does not see a device #
Work through these steps in order:
- Check the cable and power, and try another USB port.
- For audio, check that macOS lists the device in System Settings > Sound.
- Click Refresh Devices in the Audio Engine window, or Refresh Ports in the MIDI keyboard panel or the Control Surface window.
- If you hear nothing, check that Output Device is the device your speakers or headphones are on, and that no track is muted or soloed by mistake.
- If an input is missing or silent, check Microphone access.
- If a keyboard plays nothing, check that the button does not read MIDI Off, that an instrument track is selected, and that Keyboard Source and MIDI Channel match your keyboard.
For more, see Troubleshooting.